3 Simple Children’s Rug Sewing Projects That You Absolutely Must Try
This article contains three different children’s’ rug sewing projects. The first is a SNAKES AND LADDERS PLAYMAT rug, which has two functions: It can be used as a giant snakes and ladders board game and also to keep the kids warm.
The remaining projects are the ROADWAY RUG and the CHECKERBOARD RUG. Both rugs are for drafts and they look pretty cool that little kids would probably like them a lot.
The remaining projects are the ROADWAY RUG and the CHECKERBOARD RUG. Both rugs are for drafts and they look pretty cool that little kids would probably like them a lot.
PROJECT #1: SNAKES AND LADDERS PLAYMAT
SIZE
85 x 110cm
MATERIALS
2 pieces of red felt 85 x 110cm
Piece of light grey and dark grey felt, each 50 x 75cm
Piece of pink, yellow, purple, green and blue felt, each 60cm square
Piece of green and red felt, each 21x 14cm 4.6 of 90cm-wide iron-on interfacing
Small round wooden beads and gold beads, gold sequins and blue bugle beads for markings on snakes and dice
Flat red and black buttons for counters
Small amount of stuffing
Piece of thin cardboard 7.5 x 10cm
Pinking shears
MAKING THE PATTERN—CUTTING OUT
Iron interfacing to one side of the light and dark grey and the 60cm squares of felt. Enlarge the pattern pieces for the snakes, ladders, numbers and starting and finishing points as indicated on the graph. Cut them from the appropriate fabrics the required number of times (see image below).
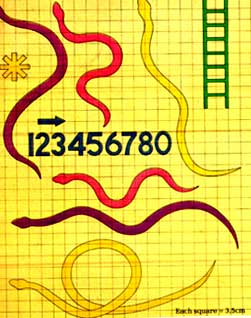
Each square = 3.5cm
Using the piece of cardboard as a template, cut 50 rectangles each of light and dark grey felt.
Trim the template to measure 7cm square, and use this to cut 6 squares of red and 6 of green felt, using the smaller pieces of felt.
Trim the template to measure 7cm square, and use this to cut 6 squares of red and 6 of green felt, using the smaller pieces of felt.
TO MAKE THE PLAYMAT
Pin the light and dark grey patches alternately over one piece of red felt, leaving 5mm between them and a border of 2cm round all four edges. Using a closely-spaced zigzag stitch and matching thread, appliqué each grey patch in place.
Position the snakes, ladders, numbers and starting and finishing points on the mat as shown in the above picture and zigzag stitch them in place.
Stitch sequins and small gold beads to the snakes’ heads, for eyes. Use blue bugle beads for fangs and wooden beads for markings.
Place the appliquéd piece on top of the other piece of red felt and stitch them together 2cm from the edges. Trim the edges of the mat with pinking shears, cutting through both layers of felt.
TO MAKE THE DICE
Stitch four felt squares together to form a ring, taking 3mm seam allowance. Stitch a square to one end, then stitch two sides of the remaining square to the other end.
Turn the cube RS out. Fill it firmly with stuffing. Slipstitch the opening edges together. Stitch sequins and small gold beads to each face of the cube to form numbers 1 to 6.
Turn the cube RS out. Fill it firmly with stuffing. Slipstitch the opening edges together. Stitch sequins and small gold beads to each face of the cube to form numbers 1 to 6.
PROJECT #2: ROADWAY RUG
SIZE
Approximately 60 x 82cm
MATERIALS
70cm of 90cm-wide medium-weight grey fabric
70cm of 90 cm-wide calico
Scraps of fabric in several different shades of green, brown and blue (see pattern below)
70cm of 90 cm-wide calico
Scraps of fabric in several different shades of green, brown and blue (see pattern below)
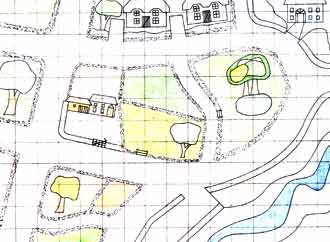
Each square = 5cm
Piece of beige toweling 40cm square
Scraps of felt and patterned fabric for houses and gardens
Green bouclé knitting yarn
Crochet hook
Scraps of felt and patterned fabric for houses and gardens
Green bouclé knitting yarn
Crochet hook
TO MAKE THE ROADWAY RUG
Following the above graph image for positioning, tack the shapes which touch the edge of the design on to the grey fabric. Using matching thread and a wide zigzag, stitch them in place.
Trim the calico to the same size as the grey fabric. Place the two together, RS facing. Stitch round the edges taking 2cm seam allowance and leaving 25cm open on one side. Trim seam and clip corners. Turn the rug RS out and slipstitch the opening edges together.
Tack the main pieces to the background, following the pattern, and zigzag stitch round the edges.
Using green bouclé yarn, crochet lengths of chain stitch to go round the edge of the fields, to represent hedges. Machine zigzag each length of chain in place.
Tack the remaining small pieces to the background and stitch them in place using satin stitch. Draw in the gates with felt-tip pen and work satin stitch over the drawn lines.
PROJECT #3: CHECKERBOARD RUG
SIZE
133cm square
MATERIALS
4m of 90cm-wide grey felt
90cm of 90cm-wide royal blue felt
90cm of 90cm-wide pale blue felt
1m of 90cm-wide red felt 1
1m of 90cm-wide green felt
20cm of 90cm-wide yellow felt
Scraps of orange, turquoise, light grey and purple felt
1m of medium-weight iron-on interfacing
Piece of paper-backed fusible webbing about 65cm square (or equivalent)
Pinking shears
Latex glue (optional)

TO MAKE THE RUG
Cut the grey felt into three lengths, each 133cm long. Cut one piece in half lengthwise. Join one wide piece and one narrow piece along the long edge, taking 1cm seam allowance. Repeat with the remaining two pieces. Press seams open.
Cut out 16 royal blue squares and 16 of pale blue, all measuring 14cm square. Cut 32 squares of iron-on interfacing to back the felt pieces, and press them in place.
Trace the small shapes on to fusible webbing, tracing 64 squares, 64 circles and 32 each of the three other shapes. Press each shape on to the appropriate color of felt.
Cut out the shapes, peel off the backing paper and bond and stitch the shapes to the pale blue squares.
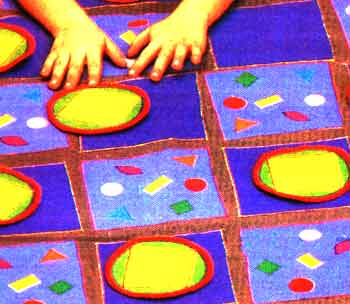
Lay one piece of grey felt, right side up, on a large flat surface. Place pale and royal blue squares alternately in rows of eight, leaving a 2 cm gap between each one and placing the outer squares 3.5cm from the edges of the grey square.
Pin and tack, then machine stitch each square in place with a medium-size zigzag. Use red thread on the pale blue squares and yellow thread on the royal blue ones. Tie off ends.
Lay the appliquéd felt section on top of the other grey felt piece, WS together. Check with a set square and meter stick that the felt edges are exactly square. Pin and straight stitch 2cm in from the edges of the two grey squares.
Using pinking shears, trim 5mm from the edges to straighten and neaten them.
Cut out 16 royal blue squares and 16 of pale blue, all measuring 14cm square. Cut 32 squares of iron-on interfacing to back the felt pieces, and press them in place.
Trace the small shapes on to fusible webbing, tracing 64 squares, 64 circles and 32 each of the three other shapes. Press each shape on to the appropriate color of felt.
Cut out the shapes, peel off the backing paper and bond and stitch the shapes to the pale blue squares.
Lay one piece of grey felt, right side up, on a large flat surface. Place pale and royal blue squares alternately in rows of eight, leaving a 2 cm gap between each one and placing the outer squares 3.5cm from the edges of the grey square.
Pin and tack, then machine stitch each square in place with a medium-size zigzag. Use red thread on the pale blue squares and yellow thread on the royal blue ones. Tie off ends.
Lay the appliquéd felt section on top of the other grey felt piece, WS together. Check with a set square and meter stick that the felt edges are exactly square. Pin and straight stitch 2cm in from the edges of the two grey squares.
Using pinking shears, trim 5mm from the edges to straighten and neaten them.
TO MAKE THE COUNTERS
Trace the large circle 24 times on to fusible webbing.
Cut out circles and press 12 on to red felt and 12 on to green felt circles.
Cut out and remove the backing; press the red circles on to a double layer of green felt and the green circles on to a double layer of fed felt.
Pin through each circle to hold the lower layer in place, and then cut fabric into squares measuring about 13cm. Zigzag stitch round edges of circles with blue thread.
Using ordinary scissors, trim edges to make circles about 12cm in diameter.
Trace 12 each of the yellow square and triangle on to fusible webbing. Press each shape on to yellow felt.
Cut out shapes and peel off backing to apply the shapes on to the center of the prepared circles.
Zigzag stitch the triangles on to the red circles and the squares on to the green circles, using green and red thread respectively. Tie off all ends on the WS.
Lightly steam press the circles to bring them back into shape (felt has a tendency to stretch), then pink round the edges.
If the rug is to be used on a bare floor, coat part or all of the underside with latex glue to prevent slipping.
