How to Sew Together a Stylish Fantasia Pillowcase Plus Cushion
FANTASIA PILLOWCASE
I wish Anna Maria Garthwaite were alive today. Not only would she make an exciting needlepoint designer but I would love to know more about her. I would love to ask her why she worked so unceasingly, and how she learned her trade without the normal apprenticeship.
Her work demonstrates a detailed knowledge of the design requirements for weaving. For a woman to be so successful in this male-dominated world, especially as a freelance designer, was certainly unusual.
Working closely with her designs, I wonder where she derived her inspiration from, so inventive and fantastic are the flowers and garlands. The difficulty for me was to choose, from the hundreds of patterns that she left behind, just four examples on which to base some pieces for this collection.
One project was to sew together a pillowcase, using the pattern of fantasy flowers and shapes shown below. Anna Maria's design was probably intended for a brocaded silk, and there are only slight touches of color, so I had a freehand to choose my own.
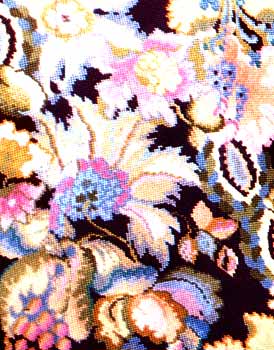
The Fantasia pillowcase is taken from a silk weaving design by Anna Maria Garthwaite. Her fantastic flowers are a gift for needlepoint. Indeed, several of her early designs are thought to be for professional embroidery.
This was one of the first pieces on which I worked for this site, and it was also the first time that I had experienced the joy of designing without all the limitations imposed by kits, where one must consider the problems of printing on canvas and the expense of using lots of colors.
The freedom simply to pick up another shade in order to add a touch of light or shadow was exhilarating. When I had finished, however, I was surprised that I had used only 24 colors and not the 50 or so that it felt like.
As one of the aims of this website is to encourage people to experiment with sewing design, and certainly to make color changes—as necessary—to existing schemes, it may be helpful to share my experience in developing this design.
What I learned was that you can lose your way and end up with an unbalanced piece if you are not practiced in the use of a large number of shades. It is better to use a restricted palette when planning the colors for the dominant features in the pattern, and only let go on the details.
I always make a shade card as I go along so that I don't get lost, and know which numbers to select, especially if the light is not good. Starting with aquamarine and green, I picked out shades close to these colors to achieve a soft and graduated result. Moving in one direction from pink, I ran into pale mauves, and going in the other direction from pink were apricot colors.
The background had to be a strong contrast. Anna Maria's was brown and I tried to find a wool that matched the shade. However, the solidity of the result made it look dreary—there is so much light and shadow in the watercolor that it is not achievable in wool. The important thing was to set the flower colors off to their best advantage, while keeping in the spirit of the original.
A dark, aubergine brown looked good, but might have become overwhelming. To offset this, and to give the piece a used look appropriate to the pillowcase, I put a band of dark, dusty purple down the center. It is almost indiscernible, but gave the effect I sought.
This pillow was a flea market find that needed a new cover, so here was a perfect opportunity. The dimensions could, however, fit a fender stool, and the length or width could easily be adjusted by repeating the pattern or adding more background.
MAKING THE FANTASIA PILLOWCASE
The pillowcase measures approximately 38 x 13¼in (97 x 34cm), but it was made wider in the middle to allow the upholsterer to accommodate the bend without stretching the canvas too tightly. The pattern repeat measures 14½in (37cm), and the twining leaves are added to the top and bottom to finish the design.
STITCHES
Tent stitch (basketweave) or half cross stitch, and French knots
MATERIALS
Interlock canvas, 12 holes per inch, 3in (7.5cm) larger all around than the finished embroidery
Size 20 tapestry needle
Size 20 tapestry needle
REQUIRED NEEDLEPOINT WOOL
H659 PLUM BROWN
60in (1.5m) per 1in (2.5cm) square
L652 DARK PURPLE
60in (1.5m) per 1in (2.5cm) square
L121 LILAC 11 skein
K128 PINKY MAUVE 1 skein
K425 DIRTY PINK 1 skein
K429 PALE DIRTY PINK 1skein
J68 PINK 2 skeins
J83 PALE PEACH 2 skeins
E20 APRICOT 1 skein
E79 PALE APRICOT 1 skein
E401 PALER APRICOT 2 skeins
B84 CREAM 1 skein
V30 PALE LEMON 2 skeins
V619 STONE 2 skeins
V617 PALE OLIVE 1 skein
V135 PALE GREEN 1 skein
V605 MID-GREEN 2 skeins
P418 SMOKY GREEN 2 skeins
P665 GREY MIST 1 skein
N48 SKY BLUE 1 skein
N122 ACQUAMARINE 2 skeins
M49 LIGHT BLUE 2 skeins
P90 JADE 1 skein
60in (1.5m) per 1in (2.5cm) square
L652 DARK PURPLE
60in (1.5m) per 1in (2.5cm) square
L121 LILAC 11 skein
K128 PINKY MAUVE 1 skein
K425 DIRTY PINK 1 skein
K429 PALE DIRTY PINK 1skein
J68 PINK 2 skeins
J83 PALE PEACH 2 skeins
E20 APRICOT 1 skein
E79 PALE APRICOT 1 skein
E401 PALER APRICOT 2 skeins
B84 CREAM 1 skein
V30 PALE LEMON 2 skeins
V619 STONE 2 skeins
V617 PALE OLIVE 1 skein
V135 PALE GREEN 1 skein
V605 MID-GREEN 2 skeins
P418 SMOKY GREEN 2 skeins
P665 GREY MIST 1 skein
N48 SKY BLUE 1 skein
N122 ACQUAMARINE 2 skeins
M49 LIGHT BLUE 2 skeins
P90 JADE 1 skein
FANTASIA CUSHION
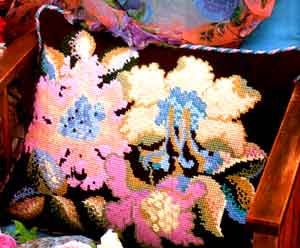 Three flowers from Anna Maria's design were scaled up and stitched on large gauge canvas to make the Fantasia Cushion. The leaves are a 20th-century addition that suit the canvas well.
Using the pattern for the flowers from the Fantasia Pillowcase, but a very different gauge canvas (7 holes to the inch), and two strands of wool threaded on the needle, I developed a design that can be a cushion, stool top, chair back or what you will. The more modern leaves were added to change the mood to one suited to the scale of the canvas.
I have always been daunted by this big canvas, and afraid that the designs would look stilted and the lines jagged. I decided, therefore, to copy something that had already proved successful on a small scale, and it seemed to work. This gave me the confidence to stitch the leaves and not worry about the seemingly huge jumps that have to be made from one stitch to the next when trying to create a curve.
There are some minor difficulties in using two threads on the needle. When you pull the wool through, the threads do not always pull at the same rate and so have to be evened up when you have finished the stitch. The longer the threads used, the more of a problem this becomes. Shorter lengths are much easier to work with, but of course you have to stop and start more often.
Having mastered the technique and got over the fears, I enjoyed the sensation of the scale and the speed with which one could cover the canvas. This encouraged me to have a second try, and I thought the rose in Double Damask would be lovely in a big version.
First, I had an enlarged color photocopy made to see if it would work. I then cut out the flower, glued it to a clean sheet of paper, and painted the leaves before committing myself to canvas. Large gauge canvas makes a refreshing change. After this jumbo scale, my usual 12 holes to the gauge felt tiny in comparison.
MAKING THE FANTASIA CUSHION
FINISHED STITCHED
19½in x 16in (50 x 40.5cm)
STITCHES
Tent stitch (basketweave) was used, with French knots; half cross would give too thin a finish on this large-scale canvas. Use two threads in the needle throughout.
MATERIALS
24 x 20in (60 x 50cm) of interlock canvas, 7 holes per inch (2.5cm)
Size 16 tapestry needle
Size 16 tapestry needle
REQUIRED NEEDLEPOINT WOOL
H659 PLUM BROWN 20 skeins
L121 LILAC 1 skein
K425 DIRTY PINK 3 skeins
J68 pink 4 skeins
E79 PEACH 3 skeins
E401 PALEST PEACH 3 skeins
R606 DARK GREEN 3 skeins
V605 MID-GREEN 2 skeins
V664 PALE OLIVE 3 skeins
V619 STNE 3 skeins
P90 JADE 1 skein
N122ACQUAMARINE 1 skein
N123 DUCK EGG BLUE 1 skein
L121 LILAC 1 skein
K425 DIRTY PINK 3 skeins
J68 pink 4 skeins
E79 PEACH 3 skeins
E401 PALEST PEACH 3 skeins
R606 DARK GREEN 3 skeins
V605 MID-GREEN 2 skeins
V664 PALE OLIVE 3 skeins
V619 STNE 3 skeins
P90 JADE 1 skein
N122ACQUAMARINE 1 skein
N123 DUCK EGG BLUE 1 skein
