7 Instrumental Advice and Techniques for Needlepoint Stitching
1) ACHIEVING A GOOD FINISH
It appears to me that there are two basic rules for an even finish and a reasonably straight canvas:
1) Natural tension
2) Diagonal tent stitch
Tight tension is the biggest killer of needlepoint embroideries, and the importance of this simple fact cannot be overemphasized.
So often I see the canvases to which hours of loving care have been taken in stitching the pattern beautifully, only for the whole effect to be spoiled by stitching that is too tight. People are afraid that looser stitches will look uneven, but the opposite is true. The tension is created by two things—the pulling of the thread through the canvas, and the stitch that comes after the one that you have just done.
This is simple to explain: it is sensible to bring your needle up in an empty square and down in a full one. When you push the needle down through the canvas in a square where there is already a stitch, your action tightens that stitch very slightly. If the stitch was not too tight to start with, a nice even finish is achieved.
When you start a stitch in a hole that already contains a stitch, you loosen that stitch, which can cause unevenness. Sometimes there is no choice except to come up in a hole where there is already a stitch. In this Case, be sure that you stab the needle from underneath rather than completing the whole stitch (down and up) in one motion. If you are using a frame, you will be doing this anyway.
The second recommendation is that you master diagonal tent stitch (basket weave). This seems difficult to grasp at first, and many people don't even attempt to use it on details. I use it everywhere possible, including stripes that are only two stitches wide.
It gives a much more even finish than any other tapestry-effect stitch; handled properly, it will reduce distortion almost to nothing. In addition, it gives a more lasting wear than half cross stitch, which, if pulled tight, can result in gappy stitches and an almost transparent finish when held up to the light.
I can tell at a glance where diagonal tent stitch has been used, and it always looks better. Vertical tent' stitch, sometimes known as continental stitch, pulls the canvas into trapeziums with uncanny ease.
2) DIAGONAL TENT STITCH
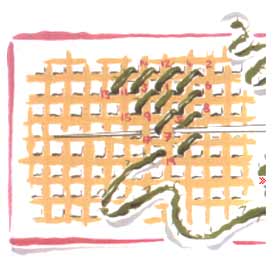
The diagram above shows how to use basket weave, starting at the top right-hand comer of a piece of work — the starting point for almost everything. The section to be filled could be background or it could be a leaf or petal.
Whatever it is, the principles are the same: bring the needle up at 1 and down at 2, up at 3 and down at 4 and so on. The rows are worked diagonally across the canvas, up and down, working towards the top of the design on the up row and towards the right-hand side of the design on the down row.
I think of each stitch as filling in a gap between the stitches of the previous row. It takes a little practice to get used to, but the results are well worth the effort.
3) FRENCH KNOTS
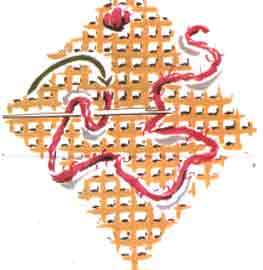
Bring the needle up through the canvas where you want the finished knot to be. Point the needle away from you and wrap the thread around the needle. Holding the thread taut with your left hand, turn the needle back and put it through the canvas.
Some Useful Hints:
To minimize distortion, of the canvas and ensure good coverage
• use a frame, if you are happy with one
• allow the wool to relax as you stitch by using natural tension—tight stitches will distort the canvas and may not cover well
• use diagonal tent (basket weave) stitch
• snip off loose ends to prevent tangles, especially where dark and light shades are adjacent - small bits of fluff can get into the pale shades, spoiling the color
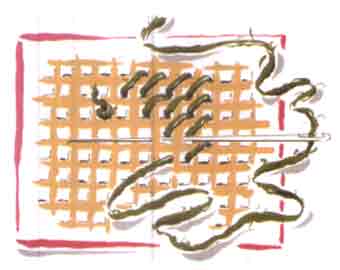
4) STARTING AND FINISHING
Threads that are too long will wear thin as you pull them through, and may knot and snag as you work. About 30in (76cm) is the maximum length, and many people recommend 20in (50cm). Using a frame reduces wear on the yarn and lessens the likelihood of knots.
To start, thread the needle and put a knot in the end of the yarn. Put the needle down through the canvas about fin (12mm) away from the point where you want to make your first stitch. Pull it through to the back until the knot is all that is left on the front of the canvas.
Start stitching towards the knot. When you reach it, cut it off. The loose thread underneath will have been stitched in by this time. To finish, run the thread under a few stitches at the back.
When you are filling large areas of background in diagonal tent stitch, you may end up with a bumpy surface if you run the wool through the back on the diagonal. In this case, it is best to run the wool under a few stitches in a horizontal line.
5) ORDER OF STITCHING
Stitch the detailed areas first, and the background last. For designs with borders, complete the central design first, then the border, and lastly the background. However, if the border is a geometric pattern, stitch this first to ensure that it fits correctly.
With geometric designs, build up your pattern bit by bit. If you start in one place and jump to another you may have difficulty in fitting the pattern together.
When stitching kits, remember that no canvas printing can be 100 per cent accurate, as the canvas itself varies and is rarely straight. If your printed design is not quite straight, use your common sense and mark a straight line to follow around the edges.
6) LEFT-HANDED STITCHERS
Canvases are usually designed to be stitched with the stitches lying from top right to bottom left. This is awkward if you are left handed. With many designs, it does not matter if you work them with the stitches lying the other way.
If you are worried about this, however, turn the work through 90 degrees, so that the top of the pattern is on your right and the bottom on your left as you face it, and work with the stitches running from the top left-hand comer to the bottom right. When you have finished, the stitches will be facing the correct way.
If you are worried about this, however, turn the work through 90 degrees, so that the top of the pattern is on your right and the bottom on your left as you face it, and work with the stitches running from the top left-hand comer to the bottom right. When you have finished, the stitches will be facing the correct way.
7) STRETCHING YOUR CANVAS
There are many different methods of stretching. I use the following, and find it nearly always works (with some tightly-stitched canvases, nothing will be completely successful).
You will need a board for pinning out, drawing pins (thumb tacks), and something with an exact rightangle—either a set square, a dressmakers' square, an old picture mount or an empty picture frame will serve so long as it can provide a true rightangle.
First steam the canvas thoroughly, either using a steam iron or holding it over boiling water (do not expose any flesh - use rubber gloves). While it is still warm and damp (but not wet) pin it on the board, pulling it straight with the right side facing you.
Be careful—wet wood can stain. Pin the center of each side first, putting the pins in the margin, about 1in (2.5cm) from the stitched edge, and then pin out toward the corners. Use your square to ensure that you are pinning it straight. Hold it over the steam again when it is straight on your board, then leave for a few days.
The purpose of the steam is to soften the canvas and melt the dressing on the canvas slightly (over wetting will flush it out). The dressing will then dry on the canvas in the correct position.
If your canvas is badly distorted, pin a piece of sheeting to the board to prevent staining and pin the canvas on with the wrong side facing you. Brush with wallpaper paste and rub it in gently with your fingers. Leave for a few days.
