Practical Advice Regarding Needlepoint on Canvas
I am often asked what the difference is between needlepoint and tapestry. The word 'tapestry' is often used to describe this craft, but technically tapestry is a type of weaving; some argue that needlepoint is also incorrect in this context, as it could cause confusion with needlepoint lace.
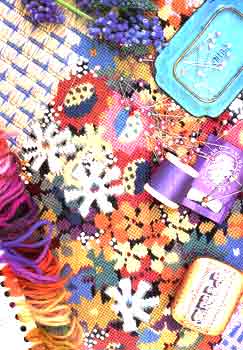 Detail from Dried Flower Basket; a fringe or shade card is a useful tool when choosing colors for a design. Thread wool samples onto a card and write the shade numbers against them to avoid making mistakes when stitching in bad light.
Canvas work is the "correct word. However, as this is not in common usage, it conjures up rug-making to many, and nothing at all to the majority. Needlepoint is the term we have chosen to use as it is understood and commonly used throughout the English-speaking world, whatever linguistic purists may suggest!
Most of the pieces presented on this website have been embroidered in tent stitch (refer this article), though I have scattered French knots, which I love, over some designs, and have used a variety of stitches in a few projects that are intended for the more adventurous to try. Rather than repeating the basic instructions for each piece, I have given some general instructions and guidelines below, and I urge even the experienced to glance through them.
Most of the pieces presented on this website have been embroidered in tent stitch (refer this article), though I have scattered French knots, which I love, over some designs, and have used a variety of stitches in a few projects that are intended for the more adventurous to try. Rather than repeating the basic instructions for each piece, I have given some general instructions and guidelines below, and I urge even the experienced to glance through them.
NEEDLEPOINT CANVAS
Throughout this website I have used Zweigart interlock canvas, in which the threads are locked together, giving a little more resistance to distortion than mono (single thread) canvas. My favorite canvas is de luxe mono, the threads of which have been polished before weaving. The yam runs through the canvas beautifully, but there are problems. It is not only extremely expensive, but it can distort badly and presents difficulties to printers.
If you are an experienced stitcher, with good tension, working on unprinted canvas and using a frame, then de luxe mono is the best. However, the interlock is a close second. Double thread (Penelope) canvas is much softer and is therefore prone to distortion. It is designed to allow tiny stitches to be inserted between the threads for details such as faces.
Most of the pieces illustrated are worked on canvas with 12 holes per inch (2.5cm) as it allows detail without straining the eyes too much. You can change the size of the finished piece by changing the gauge of the canvas.
The Rowan needlepoint wool covers canvas with 12 or 14 holes per inch well. We do not recommended it for 10 holes unless you stitch quite loosely, and even then if you are putting in a dark background it is wise to paint the canvas with fabric paint first to prevent the white showing through.
This general advice about canvas assumes that you are using tent (basket weave) or half cross stitch. For fancy stitches, you must experiment a little, as each stitch gives different coverage. For very long stitches, you will need a smaller gauge canvas, but for patterns where several stitches are piled on top of one another (creating stars for instance) you will need a larger gauge or a finer thread.
Whichever canvas you choose to work with, remember to add at least 3in (7.5cm) as a margin around the piece of work you plan. Narrow margins can make the work difficult to hold when you are stitching at the edge, and impossible to work on a frame.
NEEDLES
'Tapestry' needles have a rounded end to push through the canvas and past previous stitches without breaking into them. The right size of needle is important if you are to feel comfortable with your work. A Size 20 needle fits a 12 or 14 gauge canvas, but you will need a larger one - Size 18 - for 10 holes to the inch. On canvas with 7 holes to the inch, use a Size 16 with two strands of wool in the needle.
It is an easy and quick job to pin the canvas to the frame. Simple stretcher frames are practical, portable, and easy to use.
FRAMES
There is no doubt that the best finish is achieved by using a frame. There is something very ladylike about sitting down at your needlepoint frame with your wools in a basket at your feet. For most of us, however, that type of life is a fantasy.
Frames are a matter of personal taste and I love to use one. Most of the time, unfortunately, I am stitching on the train, in a plane or collapsed in front of the television at the end of a long day. A lot of the work for this website was stitched in bed in the early hours of the morning, when the light is good and there are no interruptions. Before going to sleep a small block of background was often achieved. A frame does not really fit into my hectic lifestyle.
If you are using a frame, use two hands. Put the needle down through the canvas with your left hand and pull it through underneath with your right hand. Do not yank the wool, but pull it through gently. Left-handed people should reverse the hands.
For diagonal tent (basket weave) stitch, which I always recommend, you will need a flat frame rather than a rolling one. If you roll up canvas that has been worked on one corner and not on the opposite one the canvas will be loose on one side, defeating the purpose of the frame. I like to see the whole piece of work in front of me and use simple stretcher frames, with the work pinned on with drawing pins (thumb tacks).
If you are not using a frame, either bind the edges of the canvas with masking tape or fold them over and machine stitch around. This prevents canvas threads from snagging on your clothes and scratching your skin. Roll the work up so that you can hold it in your left hand while stitching with your right. Try not to scrunch up the canvas, as this will encourage it to distort.
YARN
The yarn quantities recommended for the projects cannot be treated as absolutely accurate, as everyone uses different amounts. Yarn quantities present a big problem for kit producers. For these projects, we have assumed a length of 60in (1.5m) of yarn per square inch (2.5cm square) using tent (basket weave) stitch. Stitch a test square to see if this is more or less what you need.
If you use half cross stitch, you will require around 30 per cent less wool than if you use basket weave.
If you use half cross stitch, you will require around 30 per cent less wool than if you use basket weave.
WORKING FROM IMAGES
Each needlepoint design is accompanied by illustrations of the original source material and a description of how this was used to create a piece of work. Color selection and specific techniques are also discussed, but as the basic skills are the same for all the pieces they are discussed here.
Following each introduction is a photograph of the worked canvas laid flat. These photographs are included to show how colors work together, how curves are achieved and how French knots and stitch variations look close up.
The canvas gauge, needle size and the Rowan yarn shade numbers and quantities are alongside each photograph. Some people may find this sufficient to work from but, if not, charts are available by ordering from online stores.
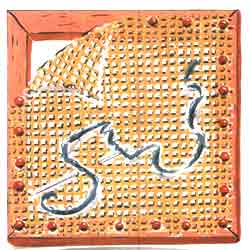
GETTING YOUR DESIGN ON CANVAS
Start by tracing or drawing the main outlines of the design on a piece of white paper. If it needs enlarging or reducing in size, take it to your local photocopying shop and give them the dimensions you are seeking.
Draw around the outlines of your drawing or photocopy with a black felt- tip pen. Place your canvas on top of this and fix the two together with masking tape. If you find it difficult to see the lines, tape both to the window.
Using a waterproof marker (I use a pale grey one), trace the outlines onto the canvas. You can now paint in the details, or just roughly mark the areas as you go along.
Things inevitably change as you work, so do not put too much detail in to start with. Dark lines may show through if stitched over with a light-colored wool, so take care. Put a large white table napkin on your lap when working, so that you can see the grey lines very clearly.
