How to Sew Cushions with Clown Motifs and Dice-Shaped Rug
CLOWN CUSHIONS
SIZE
Each cushion is 50cm square.
MATERIALS
3 blocks of plastic foam, each 50 x 50 x 10cm
2.5m of 120cm-wide dark blue poplin
Scraps of white and yellow felt for face, hands and head
Assorted patterned fabrics for costume and features
1.5m of 1.5m-wide touch-and-close fastening
2.5m of 120cm-wide dark blue poplin
Scraps of white and yellow felt for face, hands and head
Assorted patterned fabrics for costume and features
1.5m of 1.5m-wide touch-and-close fastening
MAKING THE PATTERN—CUTTING OUT
Enlarge the pieces for the appliqué as indicated on the graph below, and cut them from the appropriate fabrics. Add 1cm seam allowance to each edge along the dark lines.
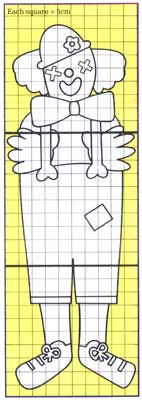
From poplin cut three 52cm squares, three 50 x 52cm pieces, twelve 12 x 52cm strips and three 6 x 52cm strips. A seam allowance of 1cm is included.
TO MAKE THE CUSHIONS
First stitch the appliqué pieces to the three 52cm squares of poplin. Tack them in place, then work close zigzag stitch over the edges.
Stitch a 12cm-wide strip to each edge of each square, RS facing.
7 Lay each piece RS up with upper edge at the top. Pin a 6cm strip to the free edge of the 12cm strip at the top of each cover, RS facing.
Pin a 50 x 52cm piece to bottom strip. Stitch all six seams.
Turn under and press 2cm along the top edge of each 6cm-wide strip. Turn and press 2cm to RS along the remaining 52cm edge of the bottom piece. Cut a 50cm length of touch-and-close tape and stitch one half over the turned edge on strip and bottom piece, leaving 1cm of fabric free at each end.
Fit the covers onto the foam blocks with WS out, and tack the corner seams. Tack the bottom piece to the remaining side edges.
Lap the bottom piece over the strip, fasten the lengths of touch-and-close and tack the side edges of the strip in place.
Remove the covers and stitch the seams.
Remove the tacking, turn covers RS out and fit them to the foam blocks. Slipstitch the edges.
RUG DICE
SIZE
Approximately 33 x 33 x 33cm (each die)
MATERIALS
Rug canvas with 12 threads, approximately, to 10cm: a rectangle 49 threads wide and 168 threads long and 2 squares, each 49 threads wide and 48 threads deep
Packs of cut rug yarn pieces (240 7cm lengths): 34 packs in main color and 3 packs in each of 3 contrasting colors
Latch hook
Linen tent thread
Curved upholstery needle
Polyurethane foam cube 32 x 32 x 32cm
Masking tape
Graph paper (small scale)
Packs of cut rug yarn pieces (240 7cm lengths): 34 packs in main color and 3 packs in each of 3 contrasting colors
Latch hook
Linen tent thread
Curved upholstery needle
Polyurethane foam cube 32 x 32 x 32cm
Masking tape
Graph paper (small scale)
MAKING THE PATTERN
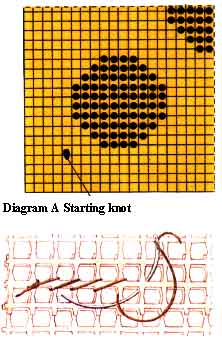
DIAGRAM A
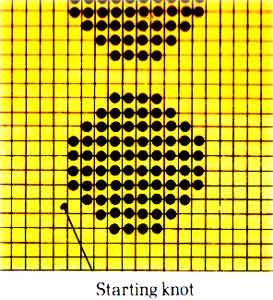
DIAGRAM B
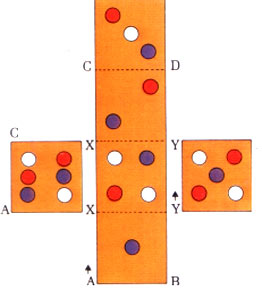
DIAGRAM C
On the sheet of graph paper draw the pattern for the entire cube following the arrangement given in Diagram C and using the detailed representations of the work in diagrams A and B as a guide in placing the dots.
These diagrams each show one corner of a square after the cube is completed: four rows on each edge of the long strip and the two side pieces are worked after the edges are stitched together.
Diagram A is the basis for the ‘1’ square (with the edge dots omitted), for the ‘4’ (with the central dot omitted) and for the ‘2’, ‘3’ and ‘5’; Diagram B is used for the 46’.
TO MAKE THE CUBE
Bind the canvas edges with masking tape to prevent fraying and catching on clothes. Begin with the long strip. Count 8 threads up from the lower edge and 8 spaces in from the left-hand edge, and work the first knot, in main color, on the 9th horizontal thread and the 9th vertical space. This first knot is marked on Diagram A.
Work 31 more knots across the canvas, thus leaving the last 8 spaces unworked. (For the method of working a knot see the illustrations below right.)
Work 10 more rows in main color. On the 11th row from the starting point begin the central dot, following your diagram. After completing the dot, work 15 rows in the main color to complete the first face of the cube.
Mark the canvas on either side of the work to denote the edge, then continue working the other squares. On the last square (the ‘3’), leave the last 4 threads of the diagram (the last 8 of the canvas) unworked, to correspond with the starting edge. You should have 152 rows completed (40 on each inner square and 36 each on the outer squares).
Now work the two sides, leaving 8 horizontal threads and 8 vertical spaces unworked all round and starting with the knots marked on diagrams A and B.
Join the squares to the rectangle along the sides marked x-x and y-y, using linen tent thread and a curved needle, as shown, and overlapping the canvas edges so that each side gains 4 knots. There will be grooves of 8 unworked strands between each of the sides.
Remove the masking tape and trim the edges slightly if necessary so that they lie smooth. Work the knots over the double canvas threads, still working in the same direction, so that the pile slants correctly.
Join the seams marked a-x and b-y, as before. (In some cases, minor variation in vertical and horizontal spacing of canvas threads may make it necessary to work an extra row in order to match the sides accurately for a perfect square.) When working the knots, make sure to work in the same direction as the rest of the knots on that side.
Join the sides c-x and d-y, and complete the knotting on these sides through the double canvas.
Slip the foam cube into the open edges. You may find this easier if you first insert the cube into a thin plastic bag, as the foam tends to catch on the canvas. When the cube is inserted, pull out the bag.
Join the remaining three edges and work knots as before to complete the cube.
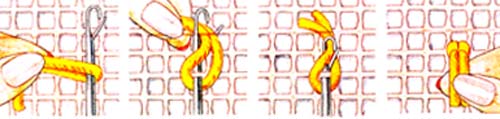
1) Fold the piece of rug yarn in half and slip it over the hook as shown in the pictures above. Holding the two ends firmly between index finger and thumb, slip the hook under one horizontal canvas thread.
2) Bring the two yarn ends into the hook as shown.
3) Pull the hook back towards you, under the canvas thread. As you do so, the latch will close over the yarn ends, pulling them through the loop.
4) Pull the two ends firmly to ensure a tight knot.
2) Bring the two yarn ends into the hook as shown.
3) Pull the hook back towards you, under the canvas thread. As you do so, the latch will close over the yarn ends, pulling them through the loop.
4) Pull the two ends firmly to ensure a tight knot.
