How to Sew a Red Riding Hood Doll Part 3
Basket & Cookies Construction
Fabric choice – Wool Felt
Supplies
Felt (2 8x11 sheet for basket, scraps for cookies & icing)
Cotton Fabric of choice (Scrap –8 x11inches ) DO NOT cut out your basket lining yet!!!
Heat n’ Bond No Sew (Iron on permanent adhesive double sided fusible webbing)
Paper patterns
Scissors/ Rotary cutter
Safe cutting surface
Stuffing
Pinking Shears
Embroidery thread
2 Buttons
1) Cut out your felt basket & cookie pattern pieces. I use freezer paper to cut out fiddly felt pieces. Wait to cut out your fabric lining…there’s a little trick!
Basket Construction
2) Using your pattern, cut out your Basket Side in Iron on permanent adhesive double sided fusible webbing. I used Heat n’ Bond No Sew. Following the manufactures instructions, iron it onto your fabric.
3) Peel off the paper backing.
4) Cut around the shiny surface. (If you find it easier you can cut around the paper backing and then remove it from the fabric).
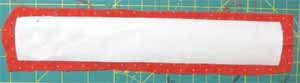
5) Using your Pinking Shears, or Decretive Scalloped edge Pinking Shears, cut along the length of the top of your lining.
6) Cut a ¼ inch off of one end of your lining fabric strip (black dashed lines above, black arrow below).
3) Peel off the paper backing.
4) Cut around the shiny surface. (If you find it easier you can cut around the paper backing and then remove it from the fabric).
5) Using your Pinking Shears, or Decretive Scalloped edge Pinking Shears, cut along the length of the top of your lining.
6) Cut a ¼ inch off of one end of your lining fabric strip (black dashed lines above, black arrow below).
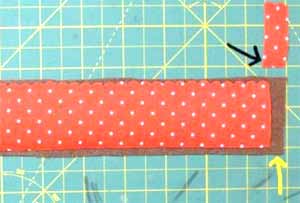
7) With the wrong/shiny side facing down, iron your lining fabric onto the felt Basket Side making sure to position it so that your pinked edge runs along the top of the Basket Side and this leaves a gap of uncovered felt along the bottom and off to one side (yellow arrow).
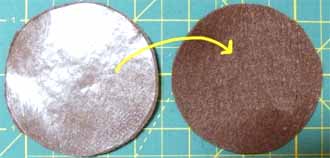
8) Using the same method as before, fuse two felt Basket Bottoms together using Iron on permanent adhesive double sided fusible webbing.
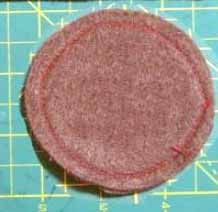
9) Sew 1/8 inch from the edge a ring around the edge of the Basket Bottom (red stitches).
9) Sew 1/8 inch from the edge a ring around the edge of the Basket Bottom (red stitches).
10) With the lining facing inwards start to pin the bottom felt edge of the Basket Side to the Basket Bottom.
11) Place you pins through the sides into the bottom at an angle but like you would a pin cushion.
12) Overlap the Basket Side ends & pin.
13) Using the whip stitch, sew all the way around the Bottom of your basket attaching your Side using a contrasting doubled over thread and finish off.
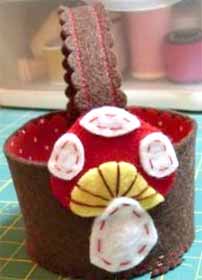
14) Sew up the overlapped edge using a straight stitch; we’ll be hiding this behind a mushroom applique. If you want to omit the applique simply use the same colored thread as the basket, in this case brown so that is not noticeable.
15) Using your pinking shears trim up both the sides of your handle.
16) To add some detail I used a contrasting thread and stitched an oblong inside the handle.
17) Pin your Handle on the inside of your basket. Position one next to the overlap on the basket. Line up both sides evenly.
18) Follow the instructions in part 1 of this guide to make your Mushroom Appliques. As before with your hair Mushroom Applique pin the Cap on first followed by the Stalk and hand sew into place
19) And you’re done…hmm now the question is…should we fill it with real sweeties/candies or not hehehe.
11) Place you pins through the sides into the bottom at an angle but like you would a pin cushion.
12) Overlap the Basket Side ends & pin.
13) Using the whip stitch, sew all the way around the Bottom of your basket attaching your Side using a contrasting doubled over thread and finish off.
14) Sew up the overlapped edge using a straight stitch; we’ll be hiding this behind a mushroom applique. If you want to omit the applique simply use the same colored thread as the basket, in this case brown so that is not noticeable.
15) Using your pinking shears trim up both the sides of your handle.
16) To add some detail I used a contrasting thread and stitched an oblong inside the handle.
17) Pin your Handle on the inside of your basket. Position one next to the overlap on the basket. Line up both sides evenly.
18) Follow the instructions in part 1 of this guide to make your Mushroom Appliques. As before with your hair Mushroom Applique pin the Cap on first followed by the Stalk and hand sew into place
19) And you’re done…hmm now the question is…should we fill it with real sweeties/candies or not hehehe.
Cookies Construction

20) Place both cookie rounds on top of each other and using your pinking shears trim around them both at the same time. This is now your matching top and bottom to one cookie. Repeat for second cookie (or as many as you think Little Red can eat hehehe).
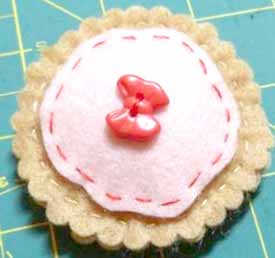
21) Take the top of your cookie and pin your icing in the center of it.
22) Using a contrasting colored thread sew around the edge of it finish off on the back.
23) Sew a cute button as cherry in the center of it :).
Please Remember, anything that is detachable such as buttons are not recommended on dolls for children under the age of 3 as they pose a choking hazard.
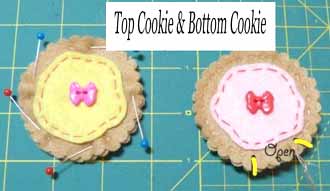
24) Match up your Top cookie to your Bottom cookie and Pin together.
25) Sew around your cookie 1/8 inch from the edge leaving a 1 inch opening. Don’t finish off, simply leave your needle threaded and carefully start to stuff your cookie.
26) Using a paintbrush lightly stuff the cookie.
27) Once you are happy with the amount of stuffing pin the opening closed and continue to sew around the outside of your cookie 1/8 inch from the edge. Finish off and hide your end inside the cookie.
28) Yum! All done!
If you intend to sell your dolls why not make a tag with your name and logo on them? Once you’ve created the tag, sew it directly to the back of your doll’s body.
If you intend to sell your dolls why not make a tag with your name and logo on them? Once you’ve created the tag, sew it directly to the back of your doll’s body.
