How to Make a Welcome Mat with Pineapple Motif
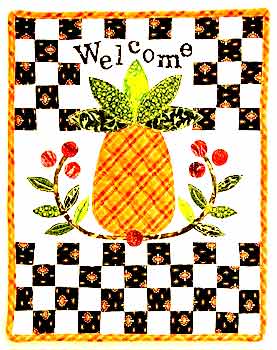
Greet your guests with this highly pleasant welcome mat. This project is can be done pretty quickly and it is so much fun!
Skill Level:
Easy
Finished Size:
Approx 28 x 35.5cm (11 x 14in), excluding binding
Materials:
✦ One fat eighth black/orange print for piecing
✦ One fat quarter cream-on-cream print for piecing
✦ One fat quarter orange plaid for piecing, pineapple and binding
✦ Scraps of four different green prints for leaves
✦ Scrap of deep coral for berries
✦ Scrap of black/gold print for lettering
✦ Two ½ x 8in green strips which have been cut on the bias for stems
✦ 38 x 45.5cm (15 x 18in) backing fabric
✦ 38 x 45.5cm (15 x 18in) wadding
✦ Threads for piecing, appliqué and quilting
✦ Fusible web
✦ Baking parchment or pressing sheets
✦ 6mm (¼in) bias tape maker
✦ Temporary spray adhesive for fabric, optional
Where to Buy:
Preparation:
All measurements include a ¼in seam allowance, unless otherwise stated.
All measurements include a ¼in seam allowance, unless otherwise stated.
The Sewing Junkie’s Notes:
The pineapple is a traditional symbol of welcome and hospitality, which is why it’s often carved on staircase newel posts and gateposts. This fun, fast and fusible project will bring a warm welcome to all your visitors, and it’s small enough to tuck into the tiniest of spaces!
The pineapple is a traditional symbol of welcome and hospitality, which is why it’s often carved on staircase newel posts and gateposts. This fun, fast and fusible project will bring a warm welcome to all your visitors, and it’s small enough to tuck into the tiniest of spaces!
Handy Hint:
If your fabric isn’t quite as wide as the Stonehenge range, you may need to make an extra pieced strip or two to cut the required number of triangles; the fabric requirements are sufficient to allow for this.
CUTTING INSTRUCTIONS
1) From the black/orange print cut forty 1½in squares.
2) From the cream print cut the following pieces:
✦Thirty-nine 1½in squares
✦ One 1½ x 5½in strip
✦ One 3½ x 5½in rectangle
✦ One 5½ x 11½in rectangle
2) From the cream print cut the following pieces:
✦Thirty-nine 1½in squares
✦ One 1½ x 5½in strip
✦ One 3½ x 5½in rectangle
✦ One 5½ x 11½in rectangle
PIECING THE BACKGROUND
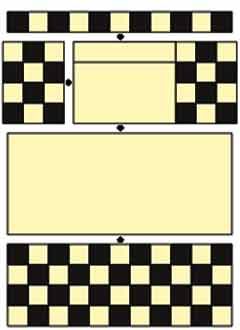
Fig 1
The instructions are given working from the top of the hanging downwards; refer to Fig 1 above as you work.
1) Take six 1½in black/orange squares and five 1½in cream squares. Starting with a black/orange square and then alternating them join to make a 1½ x 11½in row. Press the seams towards the black/orange squares.
2) Take six 1½in black/orange squares and six 1½in cream squares. Referring to Fig 1 for placement, arrange them in a three-by four layout. Join the squares into rows and then join the rows to make a 3½ x 4½in pieced rectangle. So that the seam intersections nestle neatly, press the seams of each row towards the black/orange squares. Press the seams joining the rows to one side in the same direction each time.
3) Repeat Step 2 to make a second identical 3½ x 4½in pieced rectangle.
4) Take the 3½ x 5½in cream rectangle and join the 1½ x 5½in cream strip to the top 5½in edge to make 4½ x 5½in cream unit; then join a 3½ x 4½in pieced rectangle to each 4½in edge of the cream unit. Join the row made in Step 1 to the top edge. This is the top section of the hanging.
5) Take twenty-two 1½in black/orange squares and twenty-two 1½in cream squares. Referring to Fig 1 for placement, arrange them in an eleven-by-four layout. Join the squares into rows and then join the rows to make a 4½ x 11½in pieced rectangle. So that the seam intersections nestle neatly, press the seams of each row towards the black/orange squares. Press the seams joining the rows to one side in the same direction each time. This is the bottom section of the hanging.
6) Take the 5½ x 11½in cream rectangle and join the top section to the top 11½in edge and the bottom section to the lower 11½in edge. This completes the pieced background.
APPLIQUÉ DESIGN
1) Using the motifs provided on the pattern sheet trace the following onto
the paper side of fusible web and cut out roughly: one pineapple; five large leaves; ten small leaves; seven berries; two of letter ‘e’ and one each of the other letters.
2) Fuse the motifs onto the wrong side of the fabrics as listed below and cut out neatly on the drawn lines:
✦ Orange plaid (pineapple)
✦ Green scraps (large leaves and small leaves)
✦ Deep coral (berries)
✦ Black/gold (letters)
Note: I cut my pineapple motif so that the squares in the plaid design are on-point, which creates the effect of the skin of the fruit.
3) Take the ½ x 8in green bias strips and the 6mm (¼in) bias tape maker; referring to the manufacturer’s instructions, make two ¼in wide bias strips.
4) Remove the backing paper from the fusible motifs and letters. Referring to the photograph for guidance, place the motifs, letters and stems on the background fabric. Note how the large leaves are arranged at the top of the pineapple, so that the bottom tips of the small leaves are tucked under the stems and that berries are used to hide the raw ends of the stems. Once you are happy with your layout, fuse the motifs in place.
QUILTING AND FINISHING
1) Layer the quilt by placing the backing fabric wrong side up on a clean flat surface, followed by the wadding and then the quilt top, centrally and right side up; the backing and wadding are slightly larger than the quilt top. Working from the center outwards, pin with quilters’ safety pins or tack to secure, or, if you prefer, use temporary spray adhesive for fabric.
2) Using threads to match the appliqués on top, straight-line quilt a scant 1/8in from the raw edges of the motifs; I did not edge stitch around the letters. If you wish, add detail to the pineapple, leaves and berries. Outline stitch around the motifs, which throws them into relief, and then crosshatch through the cream squares. Refer to the photograph for guidance.
3) When you have finished quilting, trim the excess backing and wadding level with the quilt top edges.
4) From your binding fabric, cut 2½in wide strips from the orange plaid; to make the most of the plaid pattern. I cut my strips on the bias. Join the strips at right angles, pressing the seams open to reduce bulk; you need approx 60in. Trim away the ‘ears’ and fold the strip in half lengthwise, wrong sides together, and press.
5) Working from the right side and starting part way down one edge, match the raw edges of the binding to the raw edges of the quilt and sew in place, folding a mitre at each corner. Before completing your stitching, neaten the short raw end of the starting piece and insert the ending piece into it. Fold the binding over to the back of the quilt and neatly slipstitch in place by hand.
6) If you wish to display the quilt, attach a hanging sleeve to the back of the quilt to slip a piece of dowel through, or use a quilt hanger. Alternatively, for a small hanging like this you could attach a piece of dowel directly to the backing, secured with a ‘loop’ of a few stitches at either end. Finally, add a label, including at least your name, location and the date the quilt was made.
Handy Hint #1
If fusible web gets stuck to the soleplate of your iron it can leave black marks where you don’t want them. To guard against this, place a sheet of baking parchment or a pressing sheet on the ironing board before you start and then another sheet between the fusible web and the iron before fusing the motifs in place.
Handy Hint #2
Bias tape makers require you to use a length of bias fabric twice the width of the narrow end of the bias tape maker – this is the size indicated on the packaging. Feed the fabric strip through the wide end of the maker and pull it through the narrow end, pressing the prepared strip as you go.
Handy Hint #3
I secured my motifs in place as I quilted, but if you prefer you could appliqué the motifs before layering and quilting. If you do this you may wish to use tear-away stabilizer against the wrong side the background, pinning it in place around the edges to secure and then tearing away the excess when you have finished.
Using stabilizer helps to prevent puckering and stitch distortion as you work, so giving a better finish. A narrow satin stitch, a small zigzag stitch or blanket stitch will work best if you use this method.
