Producing Highly Pleasing Candle Firescreen Stitches
The design on which the firescreen is based comes from a volume of 97 drawings, mostly by James Leman, which belonged to Vanners Silks until 1991, when they were purchased by the V&A. Vanners still exist; their original premises were in Spitalfields, but they are now based outside London, in Sudbury, and are part of a larger group of companies.
I enjoyed working on this design enormously, and adhered fairly closely to the original, because there was little need to change things. I had to add more colors because of the solid effect that stitched needlepoint creates.
Watercolor contains an enormous amount of variation and shading in each brush stroke which is not necessarily apparent, but nevertheless gives a light touch. When you change this for solid color, as in a needlepoint, the effect is deadening, but adding more shades here seems to have ' solved the problem.
It was important to handle these additions with care, using paler and darker shades of existing colors where possible, to retain the character of the piece. However, the candles needed emphasis and were so appealing that I was not afraid to accentuate them with a definite green.
I designed this firescreen in December 2009, and I cannot help feeling that it has a Christmas atmosphere. I would like to try it in traditional Christmas colors, with touches of gold thread in the candle flames.
These shapes and colors appear so modem that it is difficult to believe they were originally conceived in 1710. Large areas of single colors make a refreshing change after working very detailed flowers and intricately shaded leaves.
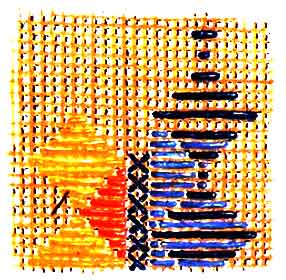
It was also fun to use different stitches and to experiment with surface embroidery to make the little trees. Because one side is the mirror image of the other, I thought it would be interesting to take this symmetry into the stitching. If you look carefully at the image below, you will see that on the left-hand side the stitches run from top left to bottom right, and on the right-hand side they run in the more usual direction of top right to bottom left.
I enjoyed working on this design enormously, and adhered fairly closely to the original, because there was little need to change things. I had to add more colors because of the solid effect that stitched needlepoint creates.
Watercolor contains an enormous amount of variation and shading in each brush stroke which is not necessarily apparent, but nevertheless gives a light touch. When you change this for solid color, as in a needlepoint, the effect is deadening, but adding more shades here seems to have ' solved the problem.
It was important to handle these additions with care, using paler and darker shades of existing colors where possible, to retain the character of the piece. However, the candles needed emphasis and were so appealing that I was not afraid to accentuate them with a definite green.
I designed this firescreen in December 2009, and I cannot help feeling that it has a Christmas atmosphere. I would like to try it in traditional Christmas colors, with touches of gold thread in the candle flames.
These shapes and colors appear so modem that it is difficult to believe they were originally conceived in 1710. Large areas of single colors make a refreshing change after working very detailed flowers and intricately shaded leaves.
It was also fun to use different stitches and to experiment with surface embroidery to make the little trees. Because one side is the mirror image of the other, I thought it would be interesting to take this symmetry into the stitching. If you look carefully at the image below, you will see that on the left-hand side the stitches run from top left to bottom right, and on the right-hand side they run in the more usual direction of top right to bottom left.
If you want to do this, turn the work clockwise by 90 degrees so that you are holding it sideways on. Stitch normally, from top right to bottom left, as you see it. When you turn it upright, you will see that the stitches run backwards, as required. If your canvases distort badly when you stitch, I advise you not to do this as you will find that the center of the work will go out of shape (please have a look at this post for advice on reducing distortion).
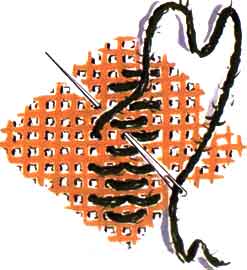
Most of the cream background is stitched in a version of Gobelin, consisting of straight up and down stitches over two threads of canvas. Alternate rows lock together, resembling narrow brickwork if you turn the turn the needlepoint on its side.
Most of the cream background is stitched in a version of Gobelin, consisting of straight up and down stitches over two threads of canvas. Alternate rows lock together, resembling narrow brickwork if you turn the turn the needlepoint on its side.
The long stitches shown above are surrounded by lines of cross stitch over two threads of canvas. The diagram also shows the configuration of the long stitches. The stitch used for the candles is illustrated below.
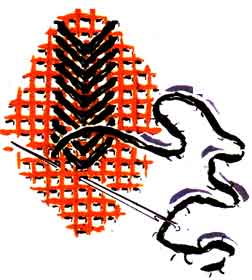
The little trees are embroidered freestyle on the surface of the stitching. Start at the top with a vertical stitch for the point and then work downwards from side to side. Do not worry about unevenness, as the French knots will hide the joins. I have used many French knots here.
Some details in the original were too difficult to stitch successfully, but something was needed in their place. The knots are worth experimenting with, as they are easily formed and quick to undo if they look wrong.
Some details in the original were too difficult to stitch successfully, but something was needed in their place. The knots are worth experimenting with, as they are easily formed and quick to undo if they look wrong.
ORDER OF STITCHING
I generally start at the center of a design and work outward, but the order of stitching must ultimately depend upon the pattern. Backgrounds should always be filled in last as you want to be free to ensure that your shapes and curves are to your satisfaction before you lock them in.
If the background is worked in a different stitch to the rest of the design, this is even more important, as you will have to adjust the stitch to fit the pattern in places.
If the background is worked in a different stitch to the rest of the design, this is even more important, as you will have to adjust the stitch to fit the pattern in places.
CHANGING THE SIZE TO FIT YOUR FIRESCREEN
The pattern can be made taller by changing the shape of the brown wiggly line above the longest candle and then adding background to fit.
To make it shorter, change the height of the candles and adjust the brown wiggly line to make it a little lower. If more is needed, take it off the bottom of the pattern, but keep the two floral motifs at the bottom corners. Move these up an inch (2.5cm) and leave out the bottom strap shape in long stitch, which lies immediately above this motif.
To make the design wider, add background and continue the shapes that currently end with the edge. To square off the top, simply add more background.
FINISHED STITCHED AREA
The screen shown here measures 24f x 18fin (63 x 47cm); for advice on altering the dimensions, see above.
STITCHES
Tent stitch (basketweave) or half cross stitch, Gobelin, herringbone, French knots, long stitch, cross stitch and surface embroidery in long stitch
MATERIALS
Interlock canvas, 12 holes per inch (2.5cm), 3in (7.5 cm) larger all around than the finished embroidery
Size 20 tapestry needle
Size 20 tapestry needle
REQUIRED NEEDLEPOINT WOOL
F78 AMBER 3 skeins
E20 PEACH 4 skeins
E79 PALE PEACH 7 skeins
E104 BUTTERSCOTCH 5 skeins
B5 PALE GOLD 3 skeins
B4 CREAM 18 skeins
M52 PRUSSIAN BLUE 4 skeins
N63 SKY BLUE 3 skeins
V605 MID-GREEN 7 skeins
W139 POND GREEN 4 skeins
D10 OLD GOLD 4 skeins
H132 WINE RED 2 skeins
J424 BRIGHT PINK 7 skeins
E20 PEACH 4 skeins
E79 PALE PEACH 7 skeins
E104 BUTTERSCOTCH 5 skeins
B5 PALE GOLD 3 skeins
B4 CREAM 18 skeins
M52 PRUSSIAN BLUE 4 skeins
N63 SKY BLUE 3 skeins
V605 MID-GREEN 7 skeins
W139 POND GREEN 4 skeins
D10 OLD GOLD 4 skeins
H132 WINE RED 2 skeins
J424 BRIGHT PINK 7 skeins
