Making a Cute Pink Flower Pattern on a Cushion Using Needlepoint
Inspired by another delightful silk pattern by Anna Maria Garthwaite, I started out to make something really big. However, having completed the pink flower I was not sure where to go next. This was a lesson in what happens when you do not plan properly.
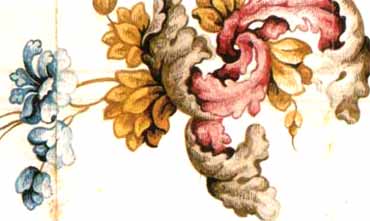
Detail from a silk weaving design by Anna Maria Garthwaite (dated 1742).
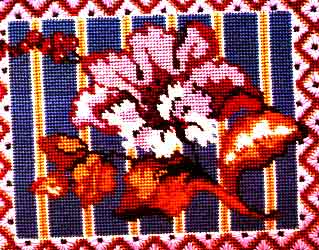
I nearly discarded the design altogether until someone asked me to create a pattern for a photograph frame. I worked out a pattern for my friend and then tried it out on the pink flower. The pattern is much more complicated than it looks, and I did not count it correctly.
When I got to the corners I had to cheat to make it fit, as you can see if you study the flat picture closely. Contrary to my usual advice that borders should be stitched last, it is wise to stitch this one first, and then put the design inside—it is easier to adjust the floral design than the geometric border pattern.
I have used a few surface stitches in the flower center in an attempt to achieve the effect of Anna Maria's weaving lines. It is worth experimenting with these long stitches as they are easy to take out if they do not work. I also used the French knots to which I am so attached. The important thing is to control their size by holding the yarn tight (instructions are given in this article).
Velvet surrounds for needlepoint have a quality that enhances the work every time. These velvet frames can be made either by mitring the corners or by sewing the canvas directly on a flat piece.
The trouble with the latter method is that you get a lump where the canvas is folded under. You can overcome this problem with embroidery, as shown here, but only if your canvas is reasonably straight. Distorted work will pull the velvet and spoil your cushion, so mitring is recommended for distorted canvases.
To make the cushion as shown below, trim the canvas, leaving just two holes of mesh along each side. Lay the work flat on the velvet and baste it in place. Using a large sewing needle with a sharp point, sew a line of chain stitch in wool all the way around, covering the raw canvas as you go. Be careful not to pull the yarn too tight or the fabric will pucker.
FINISHED STITCHED AREA
10¼ x 8¾ (26 x 22cm), excluding the chain stitched edge
STITCHES
Tent stitch (basket weave) or half cross stitch, French knots, and surface embroidery in long stitch (optional)
MATERIALS
15 x 13in (38 x 33cm) of interlock canvas, 12 holes per inch (2.5cm)
Size 20 tapestry needle
Size 20 tapestry needle
REQUIRED NEEDLEPOINT WOOL
M422 SMOKY BLUE 4 skeins
K109 LIGHT DUSTY PINK 1 skein + 3 (border)
J145 BROWNY PINK 1 skein
J434 DUSKY ROSE 1 skein + 1 (border)
J411 BRICK PINK 1 skein + 1 (border)
G46 CRIMSON 40in (1m)
P418 SMOKY GREEN 1 skein (including border)
W406 OLIVE GREEN 1 skein
DIO STRAW 1 skein
B8 GOLD 1 skein
B5 PALE GOLD 2 skeins + 2 (border)
A2 WHITE 1 skein + 1 (border)
