A Guide to Sewing Japanese Stencil Designs
 Simple patterns such as this one which is repeated around a square are relatively easy to execute, and work well on cushions.
My friend’s great-grandmother’s collection of several hundred Japanese stencils was acquired during the 1880s and 1890s. Many of the motifs reach far back into the history of Japanese design and have become traditional to the medium.
The fish, birds and bamboo subjects are familiar from the cotton kimono-style dressing gowns that the Japanese export all over the world and from the beautiful papers and cards that are readily available in the West.
However, the organic patterns that looked like specimens seen through a microscope were unexpected, and the Greek-key borders to many of the stencils were a surprise. Haiku Birds has a border of this type, which you can either use as a box edge or leave flat for a big cushion.
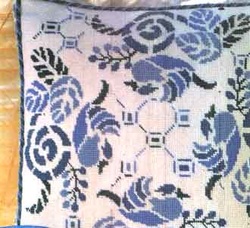
The simple but effective blue and white of traditional Japanese stencil patterns, originally used for fabrics, never date. A little book of selected Japanese stencil patterns from my friend’s collection enabled me to study and trace the designs, to enlarge the patterns and mix them up.
Normally, the stencil shapes were used by Japanese textile designers to make white patterns on indigo-dyed fabric, so my friend gave me some copies of the stencils, in which they are blue in color, thus effectively shows negative images. With all this in mind, Haiku Birds is probably a very western interpretation of Japanese motifs.
The fine lines and tiny patterns that abound in my friend’s collections are impossible to reproduce in needlepoint on a relatively large gauge canvas, but the stencil effect—where the patterns are broken by 'bridges' that hold the stencil together—are effective and simple to recreate.
The freshness of the blue and white is a relief after the heavy Victorian colors with complicated shading that are so often associated with needlepoint, but I did find it necessary to use at least four shades of blue to make it come alive. Single colors in needlepoint need other shades to set them off.
Haiku Birds is like a stencil used four times around a square. If you are designing a pattern along these lines, the simplest way is to photocopy it so that you have got four pieces exactly the same. Cut them out and position them on a sheet of paper the size of the finished cushion.
When they are all in place, trace the first pattern onto the canvas and make some marks where the other three should start. When you have stitched the first pattern, make a chart of the stitches and colors on graph paper to copy for the rest. As you turn the comer you will find the stitches will be going in a different direction in relation to the pattern, so this graph is invaluable as a working guide.
You may have to make some slight adjustments to stop parts of the pattern from joining up or becoming gappy, which tends to happen when a turn causes the stitches to lie in a different direction from the master pattern. This explanation may seem complicated, but I think you will understand the moment you start to undertake the work.
The fish, birds and bamboo subjects are familiar from the cotton kimono-style dressing gowns that the Japanese export all over the world and from the beautiful papers and cards that are readily available in the West.
However, the organic patterns that looked like specimens seen through a microscope were unexpected, and the Greek-key borders to many of the stencils were a surprise. Haiku Birds has a border of this type, which you can either use as a box edge or leave flat for a big cushion.
The simple but effective blue and white of traditional Japanese stencil patterns, originally used for fabrics, never date. A little book of selected Japanese stencil patterns from my friend’s collection enabled me to study and trace the designs, to enlarge the patterns and mix them up.
Normally, the stencil shapes were used by Japanese textile designers to make white patterns on indigo-dyed fabric, so my friend gave me some copies of the stencils, in which they are blue in color, thus effectively shows negative images. With all this in mind, Haiku Birds is probably a very western interpretation of Japanese motifs.
The fine lines and tiny patterns that abound in my friend’s collections are impossible to reproduce in needlepoint on a relatively large gauge canvas, but the stencil effect—where the patterns are broken by 'bridges' that hold the stencil together—are effective and simple to recreate.
The freshness of the blue and white is a relief after the heavy Victorian colors with complicated shading that are so often associated with needlepoint, but I did find it necessary to use at least four shades of blue to make it come alive. Single colors in needlepoint need other shades to set them off.
Haiku Birds is like a stencil used four times around a square. If you are designing a pattern along these lines, the simplest way is to photocopy it so that you have got four pieces exactly the same. Cut them out and position them on a sheet of paper the size of the finished cushion.
When they are all in place, trace the first pattern onto the canvas and make some marks where the other three should start. When you have stitched the first pattern, make a chart of the stitches and colors on graph paper to copy for the rest. As you turn the comer you will find the stitches will be going in a different direction in relation to the pattern, so this graph is invaluable as a working guide.
You may have to make some slight adjustments to stop parts of the pattern from joining up or becoming gappy, which tends to happen when a turn causes the stitches to lie in a different direction from the master pattern. This explanation may seem complicated, but I think you will understand the moment you start to undertake the work.
How to Sew Box-Edged Cushion Featuring Japanese Stencil Design
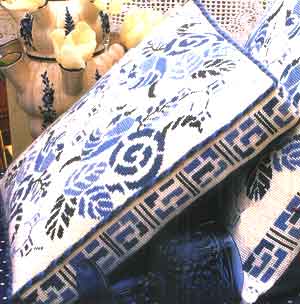 Haiku Birds has here been given a border pattern. It can be made into either a simple or box-edged cushion. The cord trim is handmade using needlepoint wool.
Materials
17 x 14-inch (43 x 35cm) of furnishing fabric
12-inch (30cm) zip to match
½ yard (1.4m) of braid trim
13-inch (33cm) square cushion pad
Matching thread
12-inch (30cm) zip to match
½ yard (1.4m) of braid trim
13-inch (33cm) square cushion pad
Matching thread
Cut the fabric widthwise in two and insert the zip (find out how to do this by clicking here). Trim spare canvas from the completed needlepoint, leaving a margin of about 1-inch (2.5cm). Snip away the canvas in the corners as shown below, leaving a margin of a scant 1/2-inch (12mm). Fold down the box edge along the line of unstitched canvas and oversew the corners to create the box shape.
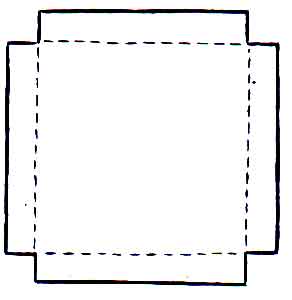
Turn this inside out and, with the zip partially open and with right sides together, machine your furnishing fabric to the box. It is easier to stitch each side individually rather than attempting to stitch around sharp corners. Turn the cushion right side out and insert the cushion pad. To finish, stitch braid trim to cover the line of raw canvas.
How to Stitch Haiku Birds Pattern
Finished Stitched Area
The box-edged cushion measures 13 ¼-inch x 12 ¾-inch (34 x 32.5cm), with an edge 1 ¾-inch (4.5cm) deep. The cushion cannot be an exact square, because the canvas holes are not perfect squares. The flat version with a key border measures 17 x 16 ½-inch (43 x 42cm). Both are stitched from the same pattern.
Stitch
Tent stitch (basket weave) or half cross stitch
Materials
For either cushion — 23-inch (58cm) square of interlock canvas, 12 holes per inch (2.5cm)
Size 20 tapestry needle
Rowan Needlepoint Wool
A110 Bright White - 30 skeins
M88 Slate Blue – 3 skeins
M111 Dusky Blue – 5 skeins
N50 Mid-Blue – 4 skeins
M49 Sea Blue - 4 skeins
Size 20 tapestry needle
Rowan Needlepoint Wool
A110 Bright White - 30 skeins
M88 Slate Blue – 3 skeins
M111 Dusky Blue – 5 skeins
N50 Mid-Blue – 4 skeins
M49 Sea Blue - 4 skeins
Needlepoint Technique for Producing Japanese Petals
Japanese Petals also originates from the little book of stencils already mentioned. I took the petal shapes directly from a small pattern and floated them over a stylized version of swirling motifs that appear in many different guises in Japanese art.
This piece is slightly more geometric than most of my designs, but I was looking for something a little different that a man might like to stitch. Many men dislike stitching flowers, but they often enjoy repeating geometric designs that require accuracy.
I have chosen a different selection of blues to that used for Haiku Birds, but if you want to make it match the latter, use the Haiku shades instead; they will work just as well.
Stitching Japanese Petals Design
Finished Stitched Area
13 ¾-inch (35 cm) square
Stitch
Tent stitch (basket weave) or half cross stitch
Materials
20-inch (50cm) square of interlock, canvas, 12 holes per inch (2.5cm)
Size 20 tapestry needle
Size 20 tapestry needle
Rowan Needlepoint Wool
A110 Bright White - 12 skeins
N48 Pale Sky Blue - 8 skeins
N50 Mid-Blue - 8 skeins
N141 Bright Blue – 13 skeins
N48 Pale Sky Blue - 8 skeins
N50 Mid-Blue - 8 skeins
N141 Bright Blue – 13 skeins
