How to Sew Together a Caterpillar Shaped Sleeping Bag
SIZE
1.8m long
MATERIALS
3.7m of 90cm-wide green fabric
3.7m of 90cm-wide yellow lining fabric
3.7m of 94cm-wide wadding
1.7m of 90cm-wide red fabric for appliqué
1.7m of 90cm-wide yellow fabric for appliqué
30cm of 90cm-wide white fabric for appliqué
30cm of 90cm-wide black fabric for appliqué
110cm zip fastener
White shirring elastic
3.7m of 90cm-wide yellow lining fabric
3.7m of 94cm-wide wadding
1.7m of 90cm-wide red fabric for appliqué
1.7m of 90cm-wide yellow fabric for appliqué
30cm of 90cm-wide white fabric for appliqué
30cm of 90cm-wide black fabric for appliqué
110cm zip fastener
White shirring elastic
MAKING THE PATTERN—CUTTING OUT
Enlarge the pattern pieces as indicated on the graph below and cut them from the appropriate fabrics.
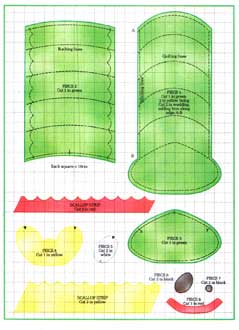
Using dressmaker’s carbon paper and tracing wheel, transfer the quilting lines from pattern piece 1 to the right side of the green fabric piece and to one yellow lining piece. Then transfer the ruching lines on pattern piece 2 to the green fabric piece.
Transfer the notches. A seam allowance of 2cm is included.
Transfer the notches. A seam allowance of 2cm is included.
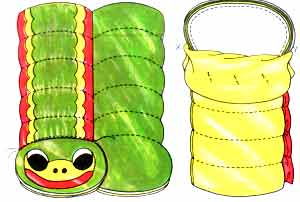
TO MAKE THE SLEEPING BAG
Place one red scalloped strip on one yellow strip, matching straight edges, RS upwards. Tack and stitch round the scalloped edge, first with a straight stitch and then with a close zigzag. Repeat with the remaining strips.
Lay the green fabric piece 2, RS up, on a flat surface and place the red and yellow strips, RS up, along the edges, making sure that the base of each scallop overlaps the edges of the green fabric by at least 4cm.
Match the points of the scallops and the ruching lines. Tack and stitch round the scallops, then zigzag stitch as before. Trim away the surplus green fabric on the WS.
Wind a machine bobbin by hand with shirring elastic. Using green sewing thread, stitch along each ruching line, extending the stitching at both sides through the points of the scallops. Also stitch along the top and bottom, 2cm from the edges.
Position pieces 4 to 8 on the RS of head piece 3; tack and straight stitch close to the edge on each shape; zigzag over first stitching.
Pin the head to the shirred body section with RS facing, matching center marks and with points X and Y at the edges. Tack and stitch pieces together.
Lay the ruched top on the green back piece, RS together, matching ruching and quilting lines and with the head farthest from you. Tack and stitch the right-hand edges together up to the head section.
Place the lining piece with the quilting lines RS up, on a flat surface with head end farthest from you. Place the other piece, RS down, on top. Tack and stitch the right-hand edges together up to the head section.
To avoid lumps, joins in wadding must always be graded. On one piece of wadding measure and mark a line 10cm from the edge from A to B. Slip your hand into the cut edge, and separate it into two equal layers. Cut the upper layer along the marked line. Repeat the process on the reverse side of the other piece of wadding.
Butt the two pieces together as shown to form a flat piece of equal thickness. (The head sections will overlap.) Using a long needle and strong white thread, stitch diagonally through both layers of wadding along both sides of the overlap.
Lay the lining fabric, RS up, on top of the wadding, with outer edges matching. Pin round edges and along the quilting lines on one section of the lining. Using matching thread, and starting from the center, stitch along the quilting lines, omitting the line marking off head section.
Place the quilted lining RS upwards and place the main fabric RS down, on top. Pin layers together along the side edges and the curved ends opposite the head. Tack and stitch, making sure that the wadding is caught in the seam; turn bag RS out.
Lay the bag flat, and pin along the line where the head meets the body (X-Y) on the front section. Using green upper thread and yellow bobbin thread, stitch along this line through all layers.
On the back section pin along the curved quilting lines and, using matching thread, quilt through all layers from the center outwards, allowing the green fabric to roll under slightly at the edges.
Fold back the lining from the head sections and pin it to the body to keep it out of the way. Fold the bag lengthwise RS together, and pin round the head section through the green fabric and wadding.
Stitch 2cm from the edge from Y round the head to X. Push the head section into the body section. Unpin the lining, lay it flat and pin the edges together as for green fabric. Stitch as before, and neaten raw edges with a small zigzag stitch. Turn the bag RS out and push lining into head.
Pin the zip to the open side of the bag, beginning a few centimeters from the open end, with the pull tab at that end. Starting from the head section, tack and stitch zip in place. Tuck in the end of the zip and finish neatly by hand. If you like, make a 12cm-long tie, and thread it through the zip pull tab.
