How to Make a Colorful Quilt from Various Scraps
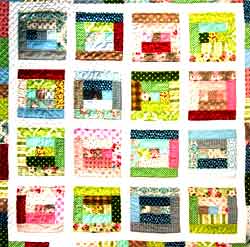
Grab some scraps from your fabrics and let’s make this simple yet eye-catching quilt!
Skill Level:
Intermediate
Finished Size:
Approx 148.5cm (58½in) square before binding
Materials:
✦2½in wide scraps from about nine green fabrics (see Special Hint)
✦2½in wide scraps from about nine pink fabrics
✦2½in wide scraps from about nine blue fabrics
✦ 1.7m (1¾yd) white-on-white fabric for sashing, borders and binding
✦ 160cm (63in) square thin wadding
✦ 160cm (63in) square white backing fabric
✦ Water-soluble marker (optional)
✦ Piecing and quilting threads
Where to Buy:
Similar fabrics are widely available from quilt fabric stores or check out the internet.
Preparation:
All measurements include a ¼in seam allowance, unless otherwise stated.
The Sewing Junkie’s Notes:
Inspiration for this piece came from looking at my growing scrap basket with a despairing heart! All I seemed to be doing was cutting into new fabric whilst old favorites in very usable quantities languished forgotten. So, I emptied the basket and started sorting, choosing a selection of sugar cookie colors for this scrap quilt.
After some easy piecing I ended up with an almost free quilt, not to mention that my scrap basket is much depleted! This is also a great project to use up any pre-cut 2½in strips left over from other projects.
Special Hint:
This quilt is made from scraps, the only unifying feature being that the fabrics within each block are in the same color range (green, pink, blue and mixed). For example, the green block has nine different scraps and as long as they are all green, it doesn’t matter about the pattern. The scraps have to be wide enough to cut into 2½in strips. The maximum strip size is 2½ x 10½in.
CUTTING INSTRUCTIONS
1) Measured cutting for the blocks is minimal in this quilt. The quilt uses a block called Courthouse Steps, which is sewn in ‘rounds’, rather like a Log Cabin block. The three center squares of each block are cut at 2½in square and sewn together.
Further 2½in wide strips are added and then trimmed down to the correct length, as described in the stepped instructions.
2) The white-on-white fabric is used for the sashing, borders and binding. You can cut the strips for the sashing and borders slightly longer if you wish (as I did) and trim them down once they are sewn to the blocks.
Cut the following:
✦ Three 2½in x width of fabric strips. Sub-cut into twelve strips each 2½ x 10½in for the vertical sashing between the blocks
✦ Four 2½in x width of fabric strips. Sew these strips together end to end and then sub-cut into three strips each 2½ x 46½in for the horizontal sashing between the blocks
✦ Five 2½in x width of fabric strips. Sew these strips together end to end and then sub-cut into two strips 2½ x 46½in and two strips for Border 1
✦ Six 2½in x width of fabric strips. Sew these strips together end to end and then sub-cut into eight strips each 2½ x 26½in for Border 3
✦ Seven strips 2½in x width of fabric for the binding
SORTING THE FABRICS
A block uses nine different fabrics, so you can use as many different ones as you like. For example, the four green blocks needed for the quilt could have nine different green fabrics, repeated for each block, or you could use thirty-six different green fabrics, so each green block is different—you choose how many of your scraps to use. Sort through your scraps and make four piles in different clearways as follows:
✦ One pile with predominantly green fabrics (Pile A)
✦ One pile with predominantly pink fabrics (Pile B)
✦ One pile with predominantly blue fabrics (Pile C)
✦ One pile with a mixture of green, pink and blue fabrics (Pile C)
✦ One pile with predominantly green fabrics (Pile A)
✦ One pile with predominantly pink fabrics (Pile B)
✦ One pile with predominantly blue fabrics (Pile C)
✦ One pile with a mixture of green, pink and blue fabrics (Pile C)
MAKING THE BLOCKS
1) There are sixteen blocks in the quilt, separated by white sashing. Three borders surround the blocks. Make a greenblock first. Choose three different fabrics from Pile A and cut a 2½in square from each. Sew the three squares together.
2) Using four different fabrics from Pile A, cut a 2½in wide strip from each, each longer than the three squares unit (i.e., longer than 6½in). Sew a strip to each side of the square trio, press the seams outwards and then trim these side strips to fit (Fig 1). Sew another two strips to the top and bottom of the unit, press the seams outwards and then trim to fit. Fig 1 shows the complete construction of the block, including the cut sizes for the pieces of the block if you prefer to work in a more traditional, structured way.
2) Using four different fabrics from Pile A, cut a 2½in wide strip from each, each longer than the three squares unit (i.e., longer than 6½in). Sew a strip to each side of the square trio, press the seams outwards and then trim these side strips to fit (Fig 1). Sew another two strips to the top and bottom of the unit, press the seams outwards and then trim to fit. Fig 1 shows the complete construction of the block, including the cut sizes for the pieces of the block if you prefer to work in a more traditional, structured way.
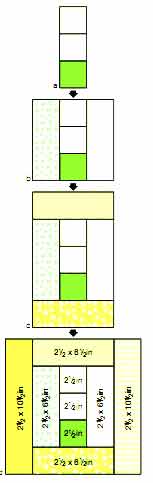
Fig 1
3) Using another two different fabrics from Pile A, cut a 2½in wide strip from each, each longer than 10½in. Sew a strip to each side of the unit, press the seams outwards and then trim the side strips to fit. Check the block is 10½in square. Make four green blocks in total, varying the fabric positions so no two blocks look the same.
4) Repeat this process to make four blocks using Pile B fabrics (pinks), four blocks using Pile C fabrics (blues) and four blocks using Pile D fabrics (mixed colors). Keep all of the 2½in wide print off-cuts as these will be used later for Border 3.
4) Repeat this process to make four blocks using Pile B fabrics (pinks), four blocks using Pile C fabrics (blues) and four blocks using Pile D fabrics (mixed colors). Keep all of the 2½in wide print off-cuts as these will be used later for Border 3.
JOINING THE BLOCKS
1) Lay out your sixteen blocks on a fl at surface in four rows of four blocks.
Move the blocks around so you have one of each colorway in each row, vertically and horizontally. With reference to Fig 2, sew the white-on-white 2½ x 10½in vertical sashing strips between the blocks. Do this for all four rows. If you have cut the strips longer than required, trim them down to match the block lengths.
Move the blocks around so you have one of each colorway in each row, vertically and horizontally. With reference to Fig 2, sew the white-on-white 2½ x 10½in vertical sashing strips between the blocks. Do this for all four rows. If you have cut the strips longer than required, trim them down to match the block lengths.
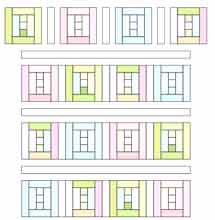
Fig 2
2) Take the three 2½ x 46½in strips you cut earlier for the horizontal sashing and sew these between the block rows. If you cut the strips a little longer than required, trim them to length. Press the seams and the quilt top. The quilt should be 46½in square at this stage.
ADDING BORDER 1
1) Take the two 2½ x 46½in strips of white-on-white fabric you cut for Border 1 earlier, sew them to the sides of the quilt and press the seams. Take the two 2½ x 50½in strips and sew them to the top and bottom of the quilt and press seams (Fig 3).
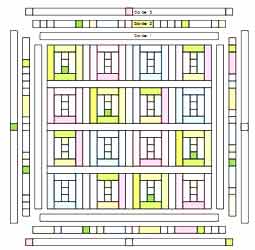
Fig 3
ADDING BORDER 2
1) Take your left-over 2½in wide colored bits and pieces and sew them together end to end in a random order. It doesn’t matter if their lengths aren’t the same, just keep sewing them together until you have enough to create two pieced borders 2½ x at least 50½in and two pieced borders 2½ x at least 54½in.
2) Sew the shorter borders to the sides of the quilt, trim the lengths to size and press seams. Sew the longer strips to the top and bottom of the quilt, trim the lengths to size and press seams (Fig 3).
2) Sew the shorter borders to the sides of the quilt, trim the lengths to size and press seams. Sew the longer strips to the top and bottom of the quilt, trim the lengths to size and press seams (Fig 3).
ADDING BORDER 3
1) Take two of the 2½ x 26½in strips of white-on-white fabric you cut for Border 3 earlier and sew them to either side of a 2½in colored print square, to make a strip 54½in long. Press seams towards the colored fabric. Repeat to make a total of four pieced strips.
2) Aligning the colored print square with the center sashing strips, sew a pieced strip to the sides of the quilt and press seams. Trim the length if required. Take the remaining two strips and sew a 2½in colored print square to each end as cornerstones. Sew these strips to the top and bottom of the quilt and press seams (Fig 3).
2) Aligning the colored print square with the center sashing strips, sew a pieced strip to the sides of the quilt and press seams. Trim the length if required. Take the remaining two strips and sew a 2½in colored print square to each end as cornerstones. Sew these strips to the top and bottom of the quilt and press seams (Fig 3).
QUILTING AND FINISHING
1) Create a quilt sandwich, with your backing piece right side down, the wadding on top and then the quilt on top, right side up. Use your favorite method to secure the sandwich.
2) Quilt as desired. The quilt shown was quilted with an all-over cross-hatch pattern, with diagonal lines about 1in apart running across the quilt in both diagonal directions. You can mark the cross-hatch quilting pattern in various ways. I used a water-soluble marker and ruler, but you could also use masking tape or a quilting guide on your machine. Once marked, quilt outwards from the centre.
3) When you have finished quilting, secure and tidy all thread ends.
Remove any fabric markings with water. Trim the excess backing and wadding level with the quilt top edges and square up the quilt.
4) Join the binding strips together at right angles, pressing the seams open to reduce bulk. Trim away the ‘ears’ and fold the strip in half lengthwise, wrong sides together, and press.
5) Working from the right side and starting part-way down one edge, match the raw edges of the binding to the raw edges of the quilt and sew in place, folding a mitre at each corner. Before completing your stitching, neaten the short raw end of the starting piece and insert the ending piece into it. Fold the binding over to the back of the quilt and neatly slipstitch in place by hand.
6) Add a label, including at least your name, location and the date the quilt was made.
