Needlepoint Tutorial for Stitching Prince Albert Flower Motif
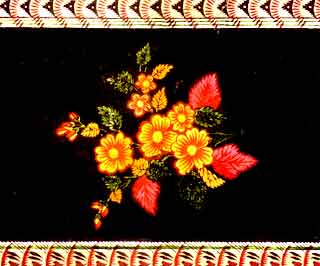
Prince Albert is probably the most Victorian pattern in this collection, with its deep but bright colors, blue background, black edgings and patterned striped border, but it is derived from a much earlier fabric design, dated 1790.
In 1986 the V&A purchased three albums of designs for printed textiles which originated in Mulhouse, a town on the French border with Germany. The designs range in date from about 1775 to the middle of the nineteenth century.
Floral stylization is a major theme in these albums, and I chose a spray of flowers and leaves as the basis of the design, which I stitched in outline in black. Originally, I had not intended to do this, but when I drew the flower outlines with black felt-tip pen so that I could trace them on the canvas, I liked the Victorian effect.
The technique of outlining the pattern in a single color is an easy -solution for those of us who find drawing and painting difficult. It has the further advantage of reducing the amount of counting needed when you are copying. Once the outlines are there, you can fill in the colors with relative ease.
I used this technique with my first pieces; looking back, they work well, and I have got over the feeling that I was cheating. Needlepoint techniques are different to those of painting, where you can shade and shape with relative ease.
Elongated diamonds are evocative of Victorian decoration, and stripes with patterns in them were also a recurring feature as I turned the pages of these albums. I wanted a striped background so that the pattern could easily be extended to cover furniture, without upsetting the scale of the design.
An overextended plain background can spoil the balance of a piece, causing pretty designs to look lost in the middle of a large chair seat or cushion. Most of the patterned stripes in these Mulhouse collections were too complicated to copy, so I made my own, taking the diamond shape of the center and stitching little black diamonds into the ribbon stripes.
Having created a pattern that could be extended; I tried it out in practice by making it into a cover for a chair seat. I found a bettered Victorian dining chair in my local junk shop and had it restored. The chair had a front and back panel which also required needlepoint for upholstery. The obvious answer for the front was to repeat the flowers, but with a simpler design on the chair seat itself I might have echoed the pattern on the wood carving for the front panel.
The upholsterer told me that it was traditional to use a tartan pattern for the back. I thought this would be easy, so using the same colors I set to work. The next time I attempt a tartan I shall copy someone else's. Tartans are woven, but in needlepoint you have to pretend that the colors pass under each other and emerge in different places.
I made so many mistakes and got so confused by this that I had to give it to someone else to finish, so I advise you to draw out a tartan with great care before attempting to stitch. The choice of colors for Albert was really dictated by the color impression of the Mulhouse books.
Black backgrounds abound, bringing into sharp contrast the yellows, greens and pinky reds of the flowers, beloved of the Victorians. Those faded furnishing fabrics that we find in antique shops give a false impression of the bright furnishing colors that were actually used.
I wonder why we have become so afraid of using colors today, but for those of you who prefer softer shades; this pattern would look lovely stitched in chalky pale pastels with pale grey outlines.
The Albert design can be applied to many different pieces of furniture, and would look good as a cushion, a stool top, a chair seat, or a bolster. The bolster would be stitched to the same dimensions as the one provided in this guide, and made up in the same way. Alternatively, the design could be used as a stool top, as shown for the Malakoff Castle (see this guide).
To make the Albert design into a stool top, extend the stripes to fit your piece of furniture. It would be advisable to consult with the upholsterer to see what margins he would need to work with, depending on the style of stool, the depth of the pad and other considerations.
To make it into a chair seat cover, refer to the guidelines described in this post. The two panels for the front and back of this chair would make pretty cushions and would be fun to put back to back, trimmed with black satin cord, as a double-sided needlepoint cushion.
PRINCE ALBERT CHAIR SEAT AND CUSHION
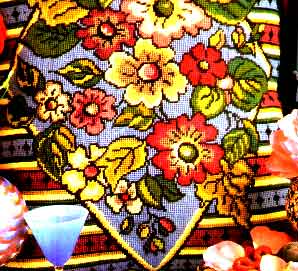
Prince Albert, used as a cushion, is here seen standing end on. If they are for normal use, cushion patterns should work when viewed from any direction.
This can be used either for a cushion or a chair seat. The finished stitched area of the chair seat shown here measured 19 x 15in (48 x 38cm), but these measurements can be adjusted by adding or subtracting background to fit your own chair (see this post yet again!). The wool quantities refer to the cushion.
STITCH
Tent stitch (basketweave) or half cross stitch
MATERIALS
De luxe mono canvas, 12 holes per inch (2.5cm), some 3in (7.5cm) larger all around than the finished embroidery
Size 20 tapestry needle
Size 20 tapestry needle
REQUIRED NEEDLEPOINT WOOL
A62 BLACK 10 skeins
M111 BLUE 12 skeins
V617 PALE OLIVE GREEN 2 skeins
VI05 OLIVE GREEN 6 skeins
T74 GRASS GREEN 1 skein
R73 DARK GREEN 2 skeins
P91 FIR TREE GREEN 10 skeins
J427 PINKY BROWN 2 skeins
H70 DARK PINK 9 skeins
G46 CRIMSON 1 skein
J424 SALMON PINK 1 skein
E20 PEACH 1 skein
E402 APRICOT 2 skeins
B6 YELLOW 7 skeins
A110 BRIGHT WHITE 1 strand
ALBERT CHAIR FRONT PANEL
The front panel of the Prince Albert chair was designed to fit the back rest. It uses the same flower and leaf shapes as the chair seat. Trace the shape, cut them out and regroup them until they fit the shape of your chair.
FINISHED STITCHED AREA
13½ x 8¾in (34 x 22cm)
STITCH
Tent stitch (basketweave) or half cross stitch
MATERIALS
20 x 15in (50 x 38cm) of interlock canvas, 12 holes per inch (2.5cm)
Size 20 tapestry needle
Size 20 tapestry needle
REQUIRED NEEDLEPOINT WOOL
A62 BLACK 4 skeins
M111 BLUE 5 skeins
V105 OLIVE 2 skeins
V617 PALE OLIVE 2 skeins
T74 GRASS GREEN 1 skein
R73 DARK GREEN 1 skein
P91 FIR TREE GREEN 1 skein
J427 PINKY BROWN 2 skeins
H70 DARK PINK 1 skein
G46 CRIMSON 1 skein
J424 SALMON PINK 1 skein
E20 PEACH 1 skein
E402 APRICOT 1 skein
B6 YELLOW 1 skein
A110 BRIGHT WHITE 1 strand
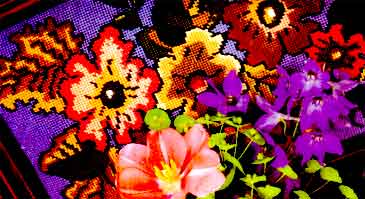
ALBERT CHAIR BACK PANEL
Draw your tartan on graph paper. For quantities, you will need 36in (1m) of wool for every 100 stitches.
STITCH
Tent stitch (basketweave) or half cross stitch
MATERIALS
Interlock canvas, 12 holes per inch (2.5cm)
Size 20 tapestry needle
Size 20 tapestry needle
REQUIRED NEEDLEPOINT WOOL
A62 BLACK
M111 BLUE
T74 GRASS GREEN
V105 OLIVE
V6l7 PALE OLIVE
V664 STRAW GREEN
J427 PINKY BROWN
H70 DARK PINK
J424 SALMON PINK
E20 PEACH
E402 APRICOT
B6 YELLOW
A110 BRIGHT WHITE
M111 BLUE
T74 GRASS GREEN
V105 OLIVE
V6l7 PALE OLIVE
V664 STRAW GREEN
J427 PINKY BROWN
H70 DARK PINK
J424 SALMON PINK
E20 PEACH
E402 APRICOT
B6 YELLOW
A110 BRIGHT WHITE
