How to Sew a Red Riding Hood Doll Part 2
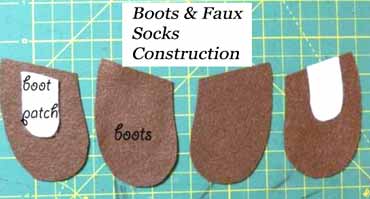
Boots & Faux Socks Construction
Fabric choice – Wool Felt
Supplies
Felt (scraps)
Paper patterns
Scissors/ Rotary cutter
Safe cutting surface
Embroidery thread
Lace scraps
Please Remember, anything that is detachable such as these small shoes are not recommended on dolls for children under the age of 3 as they pose a choking hazard.
1) Cut out your felt boot pattern, a 1/8 of an inch seam allowance has already been added. I use freezer paper to cut out fiddly felt pieces.
2) Pin the boot Patches to both front felt boot pieces leaving a small 1/8 inch gap from the top and sew (machine or by hand) 1/8 of an inch from the outer edge into place.
3) Now using a contrasting colored embroidery thread stitch 3 small X’s to mimic shoe laces all the way up the center of each front boot patch (use pattern or photo below as guide).
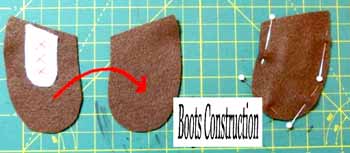
4) Pin the corresponding front of the boot onto the back boot, right sides facing inwards.
5) Sew an 1/8 inch seam around the outer edge making sure to back stitch at the ends. Clip the curved edges of the boot making sure not to go through your stitches. This ensures when you turn them the right way that the curves pop. Turn them the right way. I use a chop stick or the end of a paint brush to help turn the slippers.
6) Pin a 5 inch (12.7 cm) strip of lace around the top of each boot to create faux socks and securely sew into place.
7) They should slip on and off of your dollies legs easily.
8) TIP: If your boots are too tight turn your boot over and cut a 1 inch slit down the center of the back of each one. This enables you to slip them on easily to your dolly’s legs.
Reversible Cape Construction
Supplies
Pre-washed cotton fabric (Outer Red fabric - 1 fat quarter, Inner Pretty Patterned fabric - 1 fat quarter)
Paper pattern
Scissors/ Rotary cutter
Safe cutting surface
Ribbon - two 9 inch (23 cm) strips (I used ¼ - ½ width )
1) Tape the Hood pattern pieces together before cutting out your fabric. The Cape part of the pattern is to be cut out of a Folded piece of fabric.
Paper pattern
Scissors/ Rotary cutter
Safe cutting surface
Ribbon - two 9 inch (23 cm) strips (I used ¼ - ½ width )
1) Tape the Hood pattern pieces together before cutting out your fabric. The Cape part of the pattern is to be cut out of a Folded piece of fabric.
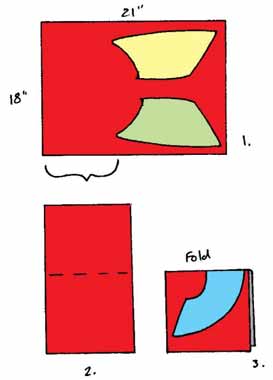
2) Use the above diagram as a guide, position your cape pattern pieces onto your fat quarter. Make sure ALL pattern pieces fit before cutting.
(a) Place the hood pattern piece right side up (yellow) on to your pre-washed and ironed fat quarter so that to point is almost in the top corner. Now position it with the right side facing down directly underneath it (green).
(b) Fold the remaining fabric in half and place your bottom cape pattern piece (blue) before cutting. Do NOT cut along the folded edge. When you unfold the fabric after you cut out your pattern it will look like a semi-circle.
(c) Repeat this entire process with your lining fabric.
3) A ¼ inch seam allowance has already been added. I like to use a rotary cutter especially on the large curves of the cape.
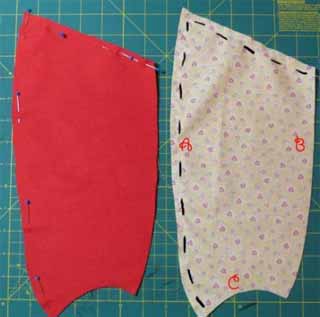
4) Take your 2 main red Hood fabric pieces, and place them with the right sides facing inwards on top of each other. Pin the back (A) and top of them together leaving the bottom neck (C) and the front (B) open. Sew together (black dashed lines) finishing off at both ends.

5) Repeat with the lining fabric.
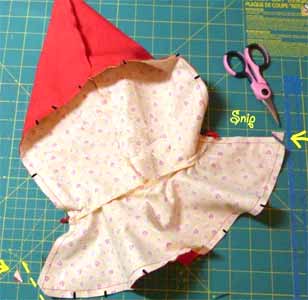
6) Snip off the top point of fabric (black arrow) on both the Main & Lining hoods making sure not to go through your stitches. This ensures when you turn your cape the right way the tip of your hood will pop out!
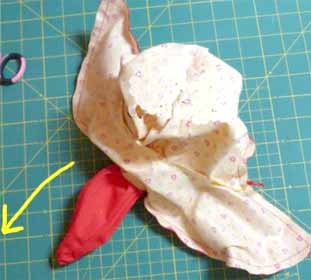
7) Using your lining fabric, turn your cape Hood the right way using the wooden end of a paint brush or chop stick to pop your point out, and the bottom Cape lining piece right side of the fabric facing up.
6) Snip off the top point of fabric (black arrow) on both the Main & Lining hoods making sure not to go through your stitches. This ensures when you turn your cape the right way the tip of your hood will pop out!
7) Using your lining fabric, turn your cape Hood the right way using the wooden end of a paint brush or chop stick to pop your point out, and the bottom Cape lining piece right side of the fabric facing up.
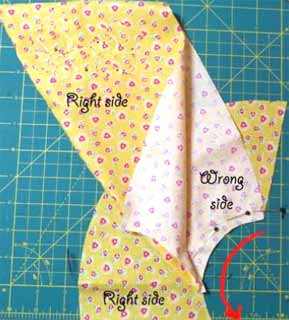
8) Pin the bottom edge of your Hood starting at one side and all the way around the neck so that it lines up with the inside small semi-circle of the top of your bottom cape fabric piece (see above and below photos).
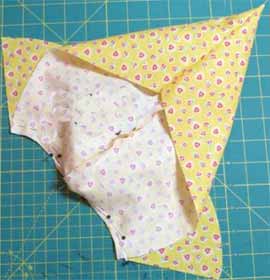
9) Both top & bottom cape pieces should match up perfectly and there shouldn’t be any overlapping material on either side. If they don’t match up, don’t panic; simply fold the excess into a tiny pleat right in the center where your hood seam is.
10) Sew these two pieces together finishing off at each end. 11) Repeat with your main Red outer cape fabric.
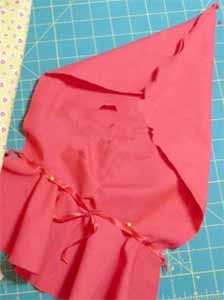
12) Cut two 9 inch (23 cm) lengths of thin ribbon, seal the ends (light under parental supervision or Fray check/stopper) and knot one end (black arrow) of each.
13) Place your Red outer cape with the wrong side on the table, and the right side of the fabric facing you. Take a ribbon and position it so that it lines up with the neck seam of your cape. Flip it over onto the right side of the cape fabric (blue arrow) so that the knotted end sticks out by ¼ over the edge (black arrow) of the fabric and the rest of the ribbon is sitting towards the center of the cape. Pin into place.
14) Repeat with the other ribbon on the opposite side.
10) Sew these two pieces together finishing off at each end. 11) Repeat with your main Red outer cape fabric.
12) Cut two 9 inch (23 cm) lengths of thin ribbon, seal the ends (light under parental supervision or Fray check/stopper) and knot one end (black arrow) of each.
13) Place your Red outer cape with the wrong side on the table, and the right side of the fabric facing you. Take a ribbon and position it so that it lines up with the neck seam of your cape. Flip it over onto the right side of the cape fabric (blue arrow) so that the knotted end sticks out by ¼ over the edge (black arrow) of the fabric and the rest of the ribbon is sitting towards the center of the cape. Pin into place.
14) Repeat with the other ribbon on the opposite side.
15) With the wrong side of the Red outer cape fabric on the table (right side facing you) and the right side of the Lining cape fabric on the table (wrong side facing you)—slip the Lining into the Outer Cape. This means both the right sides of fabric will be facing each other. (See above and below photos as a guide)
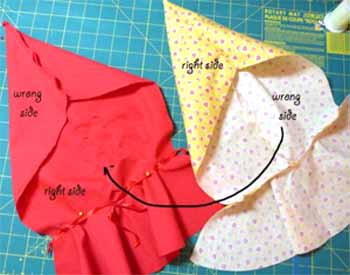
16) Pin the Lining & Outer fabrics together at the neck seams and the top hood seam first (black arrows).
17) Pin all the way around the edge making sure your ribbons are nowhere near the edge of your cape. You don’t want to accidentally sew them into the seam. Leave a 2 – 3 inch opening in the bottom (black arrows)
17) Pin all the way around the edge making sure your ribbons are nowhere near the edge of your cape. You don’t want to accidentally sew them into the seam. Leave a 2 – 3 inch opening in the bottom (black arrows)
18) Sew a ¼ inch all the way around the outside of the cape making sure you leave a 2 – 3 inch opening in the bottom (black arrows).
19) Snip off the cape's bottom point corners of fabric (yellow arrows) making sure not to go through your stitches.This ensures when you turn your cape the right way your corners will pop!
19) Snip off the cape's bottom point corners of fabric (yellow arrows) making sure not to go through your stitches.This ensures when you turn your cape the right way your corners will pop!
20) Clip the curved edges of the cape (black dashes) making sure not to go through your stitches (blue lines). This ensures when you turn your cape the right way that the curves pop.
21) Remove the pins used to hold your ribbons out of the way and turn your cape the right way, pulling it through the opening.
22) Use an old paintbrush or chop stick to push your corners out. Iron the cape and pin the opening on the bottom closed and use the ladder stitch to sew it shut.
23) Pop your Cape on Little Red…ahhh doesn’t she look lovely!! If you have a plain fabric such as Red make up another mushroom applique (see Step 2 in the Doll Construction section in the first part of this guide) to add some detail. As her cape is red I used yellow for my mushroom cap :).
24) Position the mushroom applique on the opposite side of the cape to the one you have in her hair. It’s easier to get the correct position when the cape is on your doll. Sew into place. Only sew through the outer layer of fabric so that all your stitches are hidden inside your fabric layers. Now you have a pretty reversible cape!