Tips for Making Bound and Hong Kong Seam Finishes on Garments
Hello my sewing fans!
Most of you are familiar with pinking, zigzagging or serging a seam edge to finish it and help keep it from fraying.
Have you ever wondered what a bound or Hong Kong seam finish is and where and how you use it? You will not only learn what it is, where and how to use it, but discover that there is more than one way to make a bound or Hong Kong seam finish.
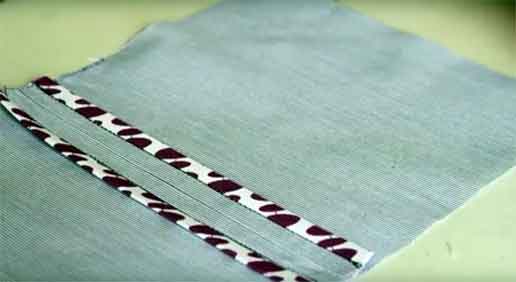
It really isn’t difficult to do. Even if you are a beginner, you can make a Hong Kong seam finish on your garment. Here are a few suggestions and tips for you.
First, check out the Home Sewing Association. They recently added another file to their how to general Sewing Guidelines. It covers both Bound and Hong Kong Seam Finishes.
The article explains the difference between the two seams finishes and tells you how to make both a bound and Hong Kong seam. It is pretty easy to follow the instructions.
I use both of these seam finishes very often especially in my good clothes and loosely woven fabrics. I also like it for most of my unlined jackets. I feel it is a more professional looking than serged seams.
Sewing Tips
A tip that I would offer is to use fusible thread in the bobbin of your sewing machine when you attach a bias strip of fabric to the seam edge.
This really helps you achieve sewing success in trying to sew a nice flat binding without ripples. Don’t forget to remove the fusible thread before you finish the seam. Follow the link to check out an article on Sewing With Fusible Thread.
Please note that you should not press the fabric strip until after you wrap it around the seam edge if you use fusible thread in the bobbin.
Most directions tell you to press the fabric away from the seam before you turn it under to the back of the seam allowance. If you use fusible thread in your bobbin and press the binding this way, you will glue your garment to the ironing board!
Don’t press until after you turn the fabric strip to the back. Then press. The thread will fuse the binding strip in place so it doesn’t slip and ripple when you stitch in the ditch or well stitch.
Be aware that if you are binding straight seams, you don’t need bias fabric strips. You can use a strip of fabric cut crosswise. This saves a lot of fabric.
Another tip is to use a lightweight seam binding tape instead of fabric strips. Press the seam binding tape just slightly less than half first.
Then simply enclose the edge of the seam allowance in the folded seam binding and stitch once with the shorter side up. This works well on straight edges. I have also used it on slight curves successfully.
Seams Great (a 100% sheer nylon fabric strip that comes on a roll) is very lightweight bias product that works quite well to finish your seams. It doesn’t add bulk to your garment.
You can find it with notions.
You don’t need to turn the edges under. Just let it curl around the seam edges and stitch it in place.
A note of caution if you plan to use a contrasting color or print for your binding. Be sure that it doesn’t show through to the outside of your garment. It might look cool inside, but if you can see it from the outside, that isn’t good.
Test in good light to be sure before you sew.You will love the couture look of a bound or Hong Kong seam finish. Try it! It just makes sense!
To Your Sewing Success
