How to Sew Kids Robin Hood Costume Plus 2 Bonus Costume Projects!
ROBIN HOOD COSTUME
SIZE
To fit a 5-6 year old
MATERIALS
80cm of 90cm-wide green felt
Piece of red felt 25 x 45cm
1m of 5cm-wide red braid
80cm of 2.5cm-wide red braid
1 green and 4 red chenille wires (used for artificial flower-making)
2 red buttons
Piece of red felt 25 x 45cm
1m of 5cm-wide red braid
80cm of 2.5cm-wide red braid
1 green and 4 red chenille wires (used for artificial flower-making)
2 red buttons
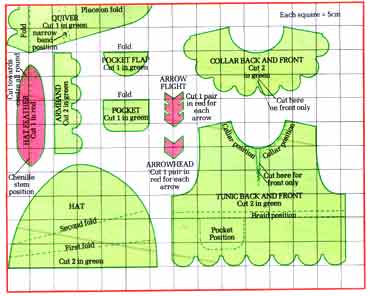
MAKING THE PATTERN—CUTTING OUT
Enlarge the pattern pieces as indicated on the graph below and cut them from the appropriate fabrics. Transfer all pattern markings. A seam allowance of 1cm is included.
TO MAKE THE OUTFIT
Stitch the shoulder and side seams of the tunic. Press seams open and, using red thread, topstitch to each side of the seam. Topstitch round armholes and neck slit. Stitch the collar seams.
Topstitch round scalloped edge of collar. Place WS of collar to RS of tunic and topstitch the collar in place round the neck.
Topstitch round the curved edge of the pocket flap. Make a buttonhole in the flap. Sew the pocket flap to the front of tunic in the position marked. Stitch along the fold of the pocket. Position the pocket just under the flap, and topstitch along the remaining three sides.
Topstitch around hem of tunic. Stitch one button to the pocket. Stitch another to the front opening of collar, and work a button loop on the other edge to correspond.
Cut a 72cm length of 2.5cm-wide braid and topstitch it to the tunic in the position marked.
Topstitch along the scalloped edge of each armband. Stitch short ends together and topstitch to either side of the seam.
For the hat, stitch the two hat pieces together round the curved edge, starting and ending at the second fold line. Trim seam, clip curve and turn hat RS out. Stitch the remainder of the curved seam from the RS.
Turn up straight edge at first fold line, press and then topstitch along lower edge. Turn up at second fold line and press to form brim. Glue green chenille wire to center of feather; cut slits as shown on the pattern and glue feather to hat.
To make the quiver, topstitch along the scalloped edge and fold edge to RS. Stitch the narrower braid to the position marked. Fold the quiver in half lengthwise, RS facing, and stitch the long edges together.
Join the ends of the wide braid to make a ring. Sew this diagonally across the quiver, so that it can be hung around the chest.
To make an arrow, glue an arrowhead and flight to opposite ends of a red chenille wire. Spread fabric glue over one side of the arrowhead and flight. Place another arrowhead and flight over the first to enclose the ends of the wire. Stitch along each side of the wire before the glue dries. Make three more arrows in the same way.
2 BONUS CHILDREN’S COSTUME SEWING PROJECTS
1) KNITTED CAPE
SIZE
To fit a 4-5 year old Length: 53 cm
MATERIALS
2 x 25g balls of Twilley’s Goldfingering (A)
21m of silver tinsel (B)
Pair of 12 mm knitting needles
5.00mm crochet hook
1.5m of 4cm-wide ribbon
21m of silver tinsel (B)
Pair of 12 mm knitting needles
5.00mm crochet hook
1.5m of 4cm-wide ribbon
TENSION
10 sts and 8 rows to 10cm in g st on 12mm needles
TO MAKE
Beg at neck edge, with A, cast on 40 sts.
Cont in g st (every row K). Work 2 rows.
**Tinsel row (WS) K to end, weaving in B on every alt st. Alternatively K to end with A and then thread B through ridges of alt sts on RS of work.
Work 1 row.**
Next row *K3, pick up loop between last st worked and next st on LH needle and K tbl—called ‘make 1’—,K1, rep from * to end.
Work 1 row. Rep from ** to ** again.
Next row *K4, make 1, K1, rep from * to end.
Work 1 row. Rep from ** to **again.
Next row *K5, make 1, K1, rep from * to end.
Cont to inc in this way on every foil 4th row until the row ‘*K13, make 1, K1, rep from * to end’ has been worked. 150 sts.
Work 1 row, then work the tinsel row again.
Cast off.
Fold 6cm at neck edge on to WS and catch down. Thread ribbon through neckline casing, leaving long ends to tie.
Front edgings
Using crochet hook and A, work into front edge as foil:
Next row, 1dc into first row end, (4ch, 1dc into next row end) to end.
HORNED HAT
To fit a 4-5 year old
MATERIALS
Piece of blue felt 45 cm square
Piece of yellow felt 22 cm square
2cm-diameter button-covering form
60cm of 2.5cm-wide grosgrain ribbon
Scrap of heavy-weight interfacing
Small amount of stuffing
Piece of yellow felt 22 cm square
2cm-diameter button-covering form
60cm of 2.5cm-wide grosgrain ribbon
Scrap of heavy-weight interfacing
Small amount of stuffing
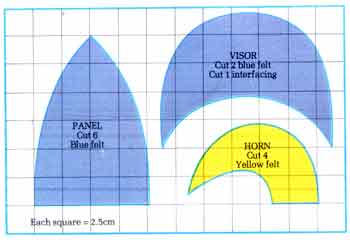
MAKING THE PATTERN—CUTTING OUT
Enlarge the pattern pieces as indicated on the graph and cut them from the appropriate fabrics. A seam allowance of 5mm is included.
TO MAKE THE HAT
Stitch the six blue panels together to form the crown. Turn crown RS out.
Cover the button form with yellow felt and it sew to the center top of the cap.
Sandwich the interfacing visor piece between the two felt pieces and topstitch round the outside edge. Place the center of the visor on the center of one panel with RS together and raw edges matching.
Tack and stitch it in place. With the visor turned upwards, tack the ribbon round the lower edge; stitch it in place. Turn the ribbon to the inside and slipstitch it to the WS of cap.
Stitch each pair of horn pieces together, leaving the base open. Fill each horn firmly, turn under the raw edges and slipstitch horns to each side of the cap.
