How to Sew a Red Riding Hood Doll Part 1
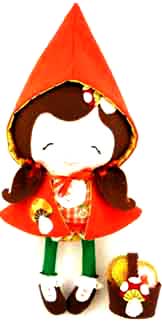
As it says in the title, this is the first installment of my instructional guide on how to sew a cute red riding hood dolly. I decided to break it down into three parts because the whole guide is pretty massive. You’ll find a link to the next installment at the end of each guide. Now let’s jump in and get started!
For the body and face I use pre washed 100% cotton. One fabric for the skin—face and arms (pink), another (green) for her legs/tights/pantyhose, and a different one (pretty patterned) for the body/dress. I use two different colored fabric for her Cape—Red outer, pretty patterned inner.
For the body and face I use pre washed 100% cotton. One fabric for the skin—face and arms (pink), another (green) for her legs/tights/pantyhose, and a different one (pretty patterned) for the body/dress. I use two different colored fabric for her Cape—Red outer, pretty patterned inner.
For her shoes, hair, mushroom appliques, shirt, basket & cookies I use wool felt. If the doll is intended for very young children I recommend an anti pill felt (such as wool felt) as that dolly will be getting a lot of Love & Kisses!!!
Supplies for Doll
Pre washed cotton fabric (1/2yard total for Doll)
Felt (3 - 8.5 x 11 sheets for hair) scrap for collar & hair mushroom
Paper pattern
Scissors/ Rotary cutter
Tailors chalk/ pencil/pen
Safe cutting surface.
Polly Fill (stuffing)
Embroidery thread Ribbon Scraps
Lace (14.5 inches (37 cm) for 1 dress layer)
1) Using your pattern, cut out your pre washed and ironed fabric and your choice of colored felt. A ¼ inch seam allowance has already been added. I like to use a rotary cutter especially on the large curves of the head.
Mushroom Applique Construction
2) Using your pattern as a guide pin the spots and underside of the mushroom onto the mushroom cap.
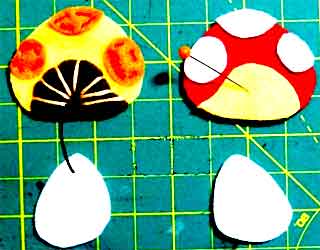
3) Using a contrasting colored embroidery thread (2-3 strands), sew the spots into place. Next using a contrasting colored embroidery thread (All the strands 6-8), sew long stitches out from the center of your mushroom’s underside felt piece to create the look of folds. Leave a small gap in the stitches in the center (see the above photo and your pattern piece for reference).
We will be adding the stalk once we start to applique it onto our doll/cape/basket. The top point of the stalk will rest inside the gap in the stitches we left (black arrow).
We will be adding the stalk once we start to applique it onto our doll/cape/basket. The top point of the stalk will rest inside the gap in the stitches we left (black arrow).
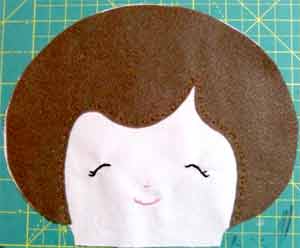
Face Construction
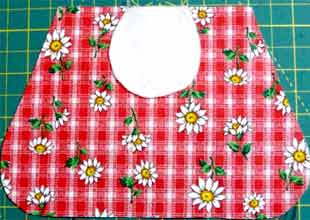
4) Take your face pattern and place your fabric face over it. Position your felt hair/bangs using your template as a guide, pin and sew (hand or machine) around the face opening (1/8 inch from the edge).
5) With your face over your pattern piece, using tailors pen/pencil or chalk, mark where your eyes, mouth and nose will be and embroider them in. I like to use the stem stitch.
6) You can also paint your face on at this time (which makes it safe for kiddies under 3). Fabric paints and pens are easy to come by so please follow manufactures instructions as each is different. Simply trace as before and paint in your face.
7) Using your pattern as a guide pin the Mushroom Cap onto your Dolls hair parting. Using the same colored thread as your Cap (here I used red) hand sew it into place, (1/8 inch or closer from the edge), pull all your thread ends through to back and tie off.
8) Place your Mushroom Stalk on top of the cap so that the top point rests in the middle of the gap of stitches. Pin and sew using a contrasting colored thread into place (1/8 inch or closer from the edge), pull all your thread ends through to back and tie off.
Limb Construction
9) With the right side of the fabric facing inwards pin the arms together. Repeat with the legs.
10) Sew the arms together making sure to leave the tops open for stuffing, finishing off at both ends with a backstitch or hand knot (keeps your seams from unraveling). Repeat with the legs.
11) Clip the curved edges making sure not to go through your stitches. This ensures when you turn them the right way that the curves pop.
12) Lightly stuff your arms and legs to within ¾ - 1 inch of the opening. The gap allows the arms to fall nicely to the dolly’s side and not look like a scarecrow :) I use an old paintbrush as a stuffing tool. The bristles hold on to the stuffing and help you get into all the ends and corners.
13) Pin the ends of the arm and legs and sew them shut. If desired, snip off any excess edges.
Adding the Shirt Applique
14) Pin the shirt to the center of the Front Body and sew (1/8 inch from the edge) into place.
Body Construction
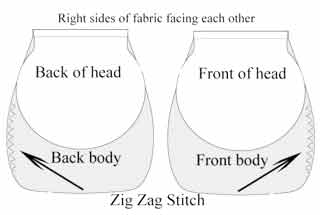
15) Pin the bottom of the back of the head to the top of the body with the right sides of fabric facing each other and sew together.
16) Repeat with the face and the front body panel.
17) Serge (or use a tight zigzag stitch) around the edges where the 2” – 3” opening for the stuffing will be. This helps stop fraying of your material when you turn your doll and stuff it. Make sure you go beyond the white arrows, where the opening will be.
If your opening is going to be on the right side of the body like mine, zigzag on the right of the front body panel and on the left of the back body panel.
Then when you make a sandwich with both of your body pieces (see section 24 below) your zigzag sides will line up. If in doubt, zigzag around both entire body panels.
Hair Bunches Construction
18) Take one of your hair bunches, lay it flat on the table and fold the top right corner over approximately 1/4 inch so that it lays flat against the felt edge and pin. Repeat with the left top corner. It will overlap the right. Pin.
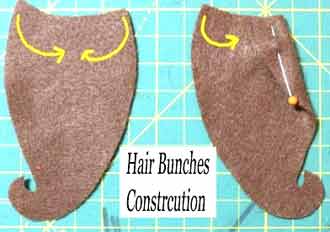
19) Repeat with the other hair Bunch making sure you fold down the opposite side first e.g. the left side so as to make a mirror image of the hair bunch we created, see second photo above for reference.
20) Baste/stitch along the edges of the folded corners of both hair Bunches using matching colored thread. This will keep them firmly together when we add them to the dolly sandwich.
21) Place the hair bundles so that the folds are facing down. Position them so that the edge lines up with the curve of the head as close to the neck as possible (see red line & Arrow). Pin in place to keep them from wiggling around. If you are worried about catching the bottom of your bunches when sewing up your dolly sandwich I suggest folding them towards the center of the face & adding another pin (see below photo).
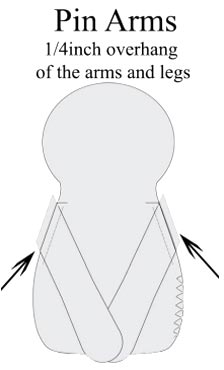
22) Position your arms so that the edges are ¼ of an inch over the side of your body. Don’t allow the arms to go above the collar neckline, otherwise they won’t look like they are coming out of your mini body outfit. Pop a pin in them to keep them from wiggling around.
23) Position the legs just before the body begins to curve so that the edges are ¼ of an inch over the side of your body and use 2 pins to keep them from shifting.
24) Place the back of the body right side facing inwards over the front creating a sandwich. Make sure that both body pieces are right side facing inwards and match up at the neck seam.
25) Sew all the way around the outside of your doll sandwich making sure to leave a 2” – 3” opening on one of the body sides after the arm and before the leg.
26) When sewing over bunches let the machine go at its own rate don’t push or force the material through. Take your time you’re almost there
27) If you wish you can double seam along the arms, bunches and legs 1/8” from the edge for added strength from too much dolly love!
28) Clip the curved edges of the head, neck and bottom of the body making sure not to go through your stitches (red lines). This ensures when you turn your dolly the right way that the curves pop.
29) Pop your hand through the hole in the side of your dolly and remove any loose pins you used to secure the legs/arms/hair. Then pull the legs and arms gently out, slowly pulling your entire doll the right way.
30) Tip: The head might be a bit fiddly as we have a small body and the 2 pieces of hair felt have a tendency to ‘stick’ together. I find loosely rolling the head (diagram 1 -3) and pushing it into the cavity (4) and up and out through the neck with the help of a paint brush to poke it through makes the process much easier @.
31) Now let’s get stuffing!! This is the fun part as you get to see your doll for the first time! Hi dolly!!
PIC
32) I like to make sure I firmly stuff my doll (an old paintbrush really helps), this allows them to sit up.
33) When stuffing the head, especially the neck area you need to keep stuffing so as to get rid of the wrinkles and creases. And to help dolly keep her head up! The amount of love your dolly is going to get over time means more stuffing than you think!
Closing the Doll
34) Once stuffed, pin the opening in the body closed and sew up using the ladder stitch to close.
Embellishments
You can add flowers or bows to her hair, buttons and bits of trim! Please remember, anything that is detachable is not recommended on dolls for children under the age of 3 as they pose a choking hazard.
Finishing the Hair and Dress
Hair Bows
35) Add your hair bows to the center of each hair bunch between the two folds of felt and as close to the head as possible. Use a lot of small stitches to make sure it’s securely in place; dolly wouldn’t want to lose one in the middle of a game with her new best friend!
Optional Quick and Easy Lace Trim Skirt/Dress
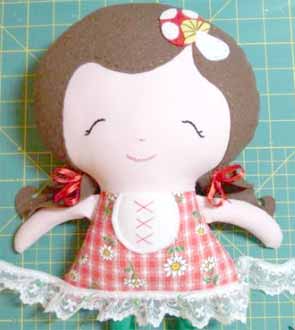
36) Using lace trim makes a sweet little dress. Add a few layers on the very bottom of her dress to give it a little ruffle. Or leave her plain, she looks just as cute! (Approximately 14.5 inches (37 cm) of trim for one layer.)
37) Simply take your lace and follow the bottom of the body around and pin it in place. (Tip: stick the pins into your dolly as you would a pincushion…much easier … just be careful not to prick yourself when you come to sew it!)
38) Turn your dolly over and continue to pin around the bottom. Snip the lace ends so that they overlap, and pop one of the sides over the other.
39) Securely stitch each layer of your lace trim skirt before adding another layer. I like to use lots of small stitches and a couple of back stitches here and there to add strength. Use a color thread that will not be noticeable.
40) I added 2 layers of lace on the bottom of my dolly dress here using the same method as above. The red lace was slightly thinner in width than the white, and I placed it so that it overlapped the white layer, hiding its stitches.
41) And there you have it, one quick, easy and oh so cute dress!