Needlepoint Techniques for Making Chair Seat
 Bright colors may be difficult to place in a sitting room, but can cheer up a dark hallway or landing. It is liberating to stitch these strong colors, using long stitches that cover the canvas quickly.
It was the stained glass gallery at a museum in the UK that inspired me to create this piece. Stained glass is made with lead outlines, filled in with solid blocks of color, allowing each shade to stand alone as well as forming an important element of the whole design.
Needlepoint wool has a dense quality that suits this medium, and I wanted to include a pattern in long stitch here to show off the colors in their own right, and also to create a design that would be much easier to stitch than the rather complicated Bargello patterns, made with vertical zigzag patterns in long stitch, which require a lot of counting.
I have been asked by friends to help them out when they have embroidered long rows of counted stitches and got lost half way through. When relaxing in the evening with a piece of needlework, few of us want to be tested in this way.
Long-stitch patterns are attractive in themselves and quick to complete. They are rarely available printed on the canvas, as exact patterns do not print well on an inexact fabric. The loose weave of canvas means that the warp and the weft are rarely straight or square, and the size of the holes on the canvas varies slightly.
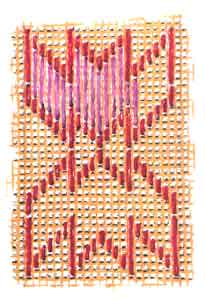
Attempts to print straight lines and geometric patterns on this medium can lead to disappointment. However, long-stitch patterns need not rely on endless counting if a simple outline shape is created and then repeated across the canvas. Having done this, you can then fill in the shapes with lots of colors.
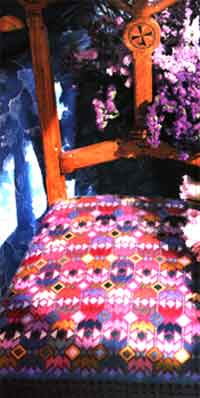
Here, I have made a shape that is like a little house and have repeated it across the first row. For the next row, I turned the shape upside down. The new shapes that this created between the rows were a bonus, and did not have to be thought about at all, but gave an opportunity for using yet another color.
It is a good idea to repeat your color choices every three or four rows to give the piece a balance and the impression that it has been planned. I used over 30 colors here, and felt that this was more than enough for the eye to deal with.
Some people may find them too bright for living rooms, but passing places, such as hallways, can take strong spots of color without wearying the eye. In any event, this design would not wear well as a dining chair-shorter stitches and a finer canvas would add strength, but the stitches used here are too long and loose.
When working in long stitch, you need to be sure that the wool will cover the canvas sufficiently well, so for this pattern I chose a canvas with 14 holes per inch (2.5cm), rather than the 12 holes per inch gauge that I use most frequently. If you choose a larger gauge, it is advisable to use two strands of wool in the needle. Stitch a small sample to ensure that the mix of canvas and wool suits your needs.
It is essential to use a frame for this work, because the canvas often gets slightly pulled when you make long stitches. This may be imperceptible as you are working, but the finished piece will not lie flat unless the stitches are even, which is difficult to achieve with handheld work.
Needlepoint wool has a dense quality that suits this medium, and I wanted to include a pattern in long stitch here to show off the colors in their own right, and also to create a design that would be much easier to stitch than the rather complicated Bargello patterns, made with vertical zigzag patterns in long stitch, which require a lot of counting.
I have been asked by friends to help them out when they have embroidered long rows of counted stitches and got lost half way through. When relaxing in the evening with a piece of needlework, few of us want to be tested in this way.
Long-stitch patterns are attractive in themselves and quick to complete. They are rarely available printed on the canvas, as exact patterns do not print well on an inexact fabric. The loose weave of canvas means that the warp and the weft are rarely straight or square, and the size of the holes on the canvas varies slightly.
Attempts to print straight lines and geometric patterns on this medium can lead to disappointment. However, long-stitch patterns need not rely on endless counting if a simple outline shape is created and then repeated across the canvas. Having done this, you can then fill in the shapes with lots of colors.
Here, I have made a shape that is like a little house and have repeated it across the first row. For the next row, I turned the shape upside down. The new shapes that this created between the rows were a bonus, and did not have to be thought about at all, but gave an opportunity for using yet another color.
It is a good idea to repeat your color choices every three or four rows to give the piece a balance and the impression that it has been planned. I used over 30 colors here, and felt that this was more than enough for the eye to deal with.
Some people may find them too bright for living rooms, but passing places, such as hallways, can take strong spots of color without wearying the eye. In any event, this design would not wear well as a dining chair-shorter stitches and a finer canvas would add strength, but the stitches used here are too long and loose.
When working in long stitch, you need to be sure that the wool will cover the canvas sufficiently well, so for this pattern I chose a canvas with 14 holes per inch (2.5cm), rather than the 12 holes per inch gauge that I use most frequently. If you choose a larger gauge, it is advisable to use two strands of wool in the needle. Stitch a small sample to ensure that the mix of canvas and wool suits your needs.
It is essential to use a frame for this work, because the canvas often gets slightly pulled when you make long stitches. This may be imperceptible as you are working, but the finished piece will not lie flat unless the stitches are even, which is difficult to achieve with handheld work.
MAKING THE CHAIR SEAT
For each shape:
Outline color — 30in (75cm)
Filling color — 30in (75cm)
The finished chair seat shown here measured 24in (60cm) across at the widest point and 22in (56cm) in depth, but these measurements can be adjusted by adding or subtracting rows of pattern to fit your own chair (more info here).
Outline color — 30in (75cm)
Filling color — 30in (75cm)
The finished chair seat shown here measured 24in (60cm) across at the widest point and 22in (56cm) in depth, but these measurements can be adjusted by adding or subtracting rows of pattern to fit your own chair (more info here).
This project offers a chance to invent your own color scheme, and can be made to almost any dimensions, so rather than give skein quantities, I have listed the length of yarn used for each shape.
STITCH
Long stitch
MATERIALS
Interlock canvas, 14 holes per inch (2.5cm), some 3in (7.5cm) larger all around than the finished embroidery.
Size 20 tapestry needle
Size 20 tapestry needle
REQUIRED ROWAN NEEDLEPOINT WOOL
T38
V105
V617
B5
B8
D10
D9
F78
L127
L501
L149
L130
L137
K92
J68
J434
J411
J424
1145
Z61
M88
M52
M53
M151
M54
P655
P91
P421
P89
P90
N141
M413
Y58
H70
G46
G43
V105
V617
B5
B8
D10
D9
F78
L127
L501
L149
L130
L137
K92
J68
J434
J411
J424
1145
Z61
M88
M52
M53
M151
M54
P655
P91
P421
P89
P90
N141
M413
Y58
H70
G46
G43
