How to Sew a Bed Runner with Stonehenge Pattern
Use textured prints to make this stylish addition to your bedroom
Skill Level:
Medium
Finished Size:
Approx 86.5 x 203cm (34 x 80in), excluding binding
Materials:
I used Stonehenge fabrics by Northcott but you could use other textured prints instead. Fabric requirements are based on a usable width of 107cm (42in).
40cm (½ yd) light grey, fabric A
40cm (½ yd) darker grey, fabric B
30cm (3/8 yd) second light grey, fabric C
30cm (3/8 yd) second darker grey, fabric D
80cm (3⁄8 yd) cream, fabric E
80cm (7/8 yd) purple/green, fabric F
70cm (¾ yd) black, fabric G
96.5 x 213cm (39 x 80in) backing fabric
96.5 x 213cm (39 x 80in) wadding
Threads for piecing and quilting
Cutting ruler with a 45-degree line
Where to Buy:
For more information about Stonehenge fabrics by Northcott visit www.northcott.net. Other textured prints are also widely available from quilt fabric stores.
Preparation:
All measurements include a ¼ inch seam allowance, unless otherwise stated.
The Sewing Junkie’s Notes:
I have only visited Stonehenge and Avebury stone circles in Wiltshire in recent years and they made such an impression on me. So you can imagine how thrilled I was to discover the Stonehenge range of fabrics, which look just like the stones with their amazing array of colors! I selected two simple block designs for this bed runner to show off the varying shades in these fabrics.
Handy Hint:
If your fabric isn’t quite as wide as the Stonehenge range, you may need to make an extra pieced strip or two to cut the required number of triangles; the fabric requirements are sufficient to allow for this.
CUTTING INSTRUCTIONS
1) From each of fabrics A and B cut twelve 4 ½ x 10 ½in rectangles: block one.
2) From each of fabrics C and D cut eight 4 ½ x 10 ½in rectangles: block one.
3) From each of fabrics E and F cut ten 2 ½in wide strips across the width of the fabrics.
4) From fabric G cut the following pieces:
(a) Four ½in wide strips across the width of the fabric; join into pairs on the short ends and trim to give two 1 ½in x 80 ½in strips, or if you prefer you could trim to length after adding to the runner center
(b) Seven 2 ½in wide strips across the width of the fabric
BLOCK ONE
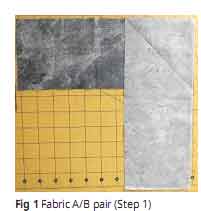
1) Take one fabric A and one fabric B rectangle. Place the fabric B rectangle horizontally and right side up on a clean fl at surface. Right side down, place the fabric A rectangle vertically on top as shown and then mark a line on fabric A from the top left corner to the bottom right corner. See Fig 1.
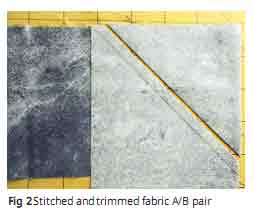
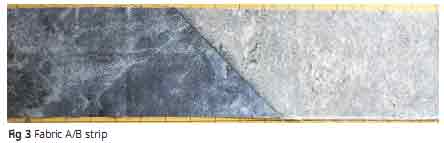
2) Pin to secure and then stitch on the marked line. Trim ¼in beyond the marked line (Fig 2), open out and press the seam towards fabric B (Fig 3). The fabric A/B strip should measure 4 ½ x 16 ½ in (unfinished)
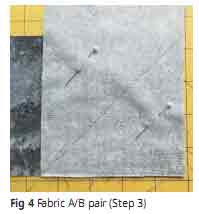
3) Take one fabric A and one fabric B rectangle. Place the fabric B rectangle horizontally and right side up on a clean fl at surface. Right side down, place the fabric A rectangle vertically on top as shown and then mark a line on fabric A from the bottom left corner to the top right corner. See Fig 4. Pin, stitch, trim and press as before, but note that the joining seam will run in the opposite direction this time.
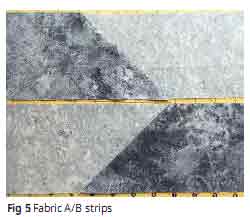
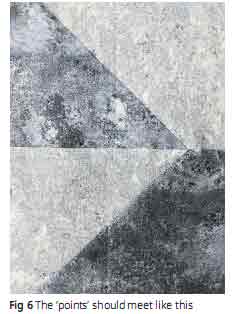
4) Lay out the fabric A/B strips made in Steps 2 and 3 as shown in Fig 5. Matching up the seams, place the top strip right side down on top of the lower strip and then join on the top long edge. Open out and press to make a fabric A/B half-block unit – the ‘points’ should meet exactly (Fig 6).
5) Repeat Steps 1–4 to make a second fabric A/B half-block unit.
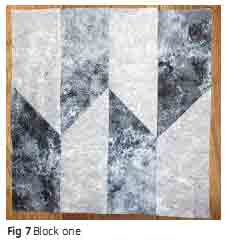
6) Join the fabric A/B half-block units made in Steps 4 and 5 to complete a block one, which should measure 16 ½in square (unfinished). See Fig 7.
6) Join the fabric A/B half-block units made in Steps 4 and 5 to complete a block one, which should measure 16 ½in square (unfinished). See Fig 7.
7) Repeat Steps 1–6 to make a total of three fabrics A/B block one.
8) Repeat Steps 1–6, but this time using fabric C and fabric D rectangles, to make a total of two fabrics C/D block one.
8) Repeat Steps 1–6, but this time using fabric C and fabric D rectangles, to make a total of two fabrics C/D block one.
BLOCK TWO
1) Take one fabric E and one fabric F 2 ½in wide strip and join them on one long edge to give a pieced strip; press the seam towards fabric F.
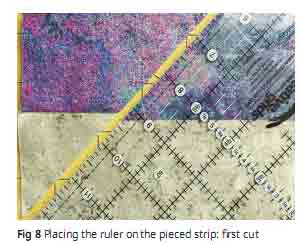
2) With fabric E at the bottom, place the pieced strip right side up on a cutting surface. Take your cutting ruler and place it on the pieced strip with the 45-degree line running along the bottom edge of the pieced strip; trim away the fabric to the left of the ruler. See Fig 8.
2) With fabric E at the bottom, place the pieced strip right side up on a cutting surface. Take your cutting ruler and place it on the pieced strip with the 45-degree line running along the bottom edge of the pieced strip; trim away the fabric to the left of the ruler. See Fig 8.
3) Turn the ruler so its corner is at the top of the pieced strip and the 45-degree line is running along the bottom edge; cut along the right-hand edge of the ruler. See Fig 9. This will give you a triangle with fabric F at the tip.
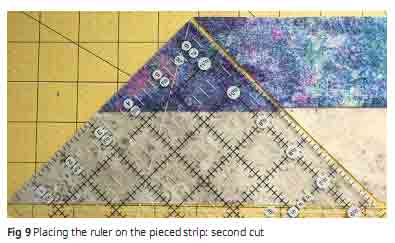
4) By turning the ruler, continue to cut triangles from the pieced strip. You should be able to cut eight triangles in total, four with fabric F at the tip and four with fabric E at the tip.
5) Repeat Steps 1–4 with the remaining 2 ½in wide fabric E and F strips to give a total of forty triangles with fabric F at the tip and forty triangles with fabric E at the tip.
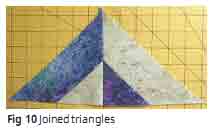
6) Take one triangle with a fabric F tip and one with a fabric E tip; join as shown in Fig 10. Repeat to make a second unit.
5) Repeat Steps 1–4 with the remaining 2 ½in wide fabric E and F strips to give a total of forty triangles with fabric F at the tip and forty triangles with fabric E at the tip.
6) Take one triangle with a fabric F tip and one with a fabric E tip; join as shown in Fig 10. Repeat to make a second unit.
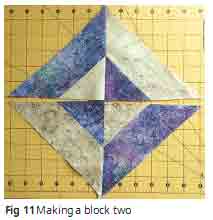
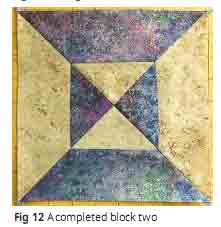
7) Join the units made in Step 6 to complete a block two, which should measure 8 ½in square (unfinished). See Figs 11 and 12.
8) Repeat Steps 6 and 7 to make a total of twenty of block two.
PIECING THE RUNNER
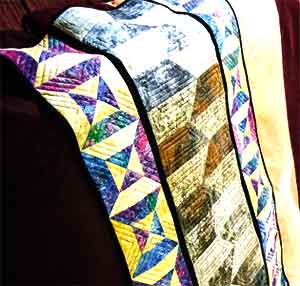
1) Referring to the photograph for guidance, starting with a fabric A/B block and then alternating them, join the fabric A/B and fabric C/D block ones to create the runner center, which should measure 16 ½in x 80 ½in (unfinished).
2) Join a 1 ½in x 80 ½in fabric G strip to each side of the runner center.
3) Take ten of block two and join to create an 8 ½in x 80 ½in strip (unfinished); refer to the photograph for the orientations of the blocks. Repeat to make a second strip, but note that the block orientations are the reverse of the first strip. Join a strip to each side of the runner center to complete the runner top, which should measure 34 ½in x 80 ½in (unfinished).
QUILTING AND FINISHING
1) Give your runner top and backing a good press. Layer the runner by placing the backing fabric wrong side up on a clean fl at surface, followed by the wadding and then the runner top, centrally and right side up; the backing and wadding are slightly larger than the runner top. Working from the center outwards, pin with quilters’ safety pins or tack to secure.
2) Quilt as desired by hand or machine. Angela followed the shapes of the patches of the block ones and the triangles of the block twos to create the illusion of sarsen stones rising from the ground. Whatever design you use, so that the quilt lies flat, try to have an even amount of stitching over the whole quilt surface.
3) When you have finished quilting, trim the excess backing and wadding level with the quilt top edges.
4) Join the 2 ½in wide fabric G strips at right angles, pressing the seams open to reduce bulk. Trim away the ‘ears’ and fold the strip in half lengthwise, wrong sides together, and press.
5) Working from the right side and starting part way down one edge, match the raw edges of the binding to the raw edges of the runner and sew in place, folding a mitre at each corner. Before completing your stitching, neaten the short raw end of the starting piece and insert the ending piece into it. Fold the binding over to the back of the runner and neatly slip stitch in place by hand.
6) Add a label, including at least your name, location and the date the runner was conceived.
