A Guide on How to Stitch Together an Anna Maria Cushion
I named this after Anna Maria Garthwaite, as her work has given me so much pleasure. There is a wonderful book of the V&A collections entitled, Silk Designs of the Eighteenth Century by Natalie Rothstein. It contains over 370 color plates, many of which illustrate designs by Anna Maria and by James Leman, and they are magnificent. My eyes translate them into needlepoint patterns every time I open the book.
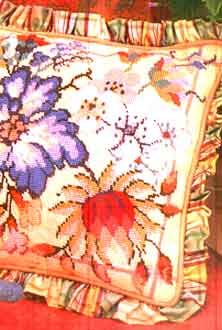 The Anna maria Cushion is based on her silk design. The tartan frill and pale orange piping create a pretty frame for the flowers.
This silk design, with its flying petals and whimsical stalks, was very appealing, and though thin lines can be difficult to achieve in needlepoint, I thought they might work against a light background. Using Anna Maria's exotic flower shapes, the design for this cushion was quite simple to put together.
I traced the flowers and bunched them together to fit the cushion shape. I used watercolor pencils to color the design before starting my stitching, but changes were made, for what works on paper does not always translate successfully. The wool colors come out much darker than they look in the hand.
When choosing the colors, I started with the blues and rusts and greens of the original, then added shades that were quite close to these base colors, thereby accentuating them rather than changing them. The pale yellow background was the best color that I could find to set off both the spring and autumn tints that make up this design.
The pale orange stripe around the edge was put in to match a piece of material that I had fancied for piping. It is a good idea to look around at your furnishings and spot color details that you like so that you can pick them up in your needlepoint by including a few French knots or motifs in backgrounds.
STITCHING THE ANNA MARIA CUSHION
FINISHED STITCHED AREA
14¼ x 10½in (36 x 27cm)
STITCH
Tent stitch (basketweave) or half cross stitch
MATERIALS
20 x 16½in (50 x 42cm) or interlock canvas, 12 holes per inch (2.5cm)
Size 20 tapestry needle
Size 20 tapestry needle
REQUIRED NEEDLEPOINT WOOL
V30 PALE LEMON 14 skeins
183 PALE PINK 1 skein
E401 PALE APRICOT 1 skein
E20 PEACH 2 skeins
J412 DUSKY PINK 1 skein
G46 CRIMSON 1 skein
E147 TOFFEE 1 skein
P416 PALE MINT 2 skeins
P89 PALE JADE 1 skein
V135 GREEN 1 skein
R430 DARK GREEN 2 skeins
M88 SMOKY BLUE 2 skeins
M414 SEA BLUE 2 skeins
N48 LIGHT BLUE 1 skein
A110 BRIGHT WHITE 2 skeins
