How to Design a Bolster with Floral Pattern
When designing a bolster you have to think of the pattern as one continuous form that goes around and around. Anna Maria Garthwaite's repeating patterns are ideal, and once again my local photocopying shop was extremely helpful and produced a blow-up of my tracing that fitted the circumference of the bolster cushion perfectly.
This was taken from a design for a tobine (warp-patterned silk). As you can see from the illustration, Anna Maria's design includes subtly shaded stripes to accommodate the loom.
This was taken from a design for a tobine (warp-patterned silk). As you can see from the illustration, Anna Maria's design includes subtly shaded stripes to accommodate the loom.
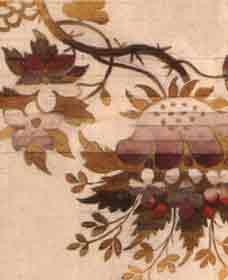
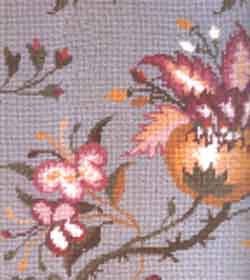
This works with silks, where there is a lot of reflection off the cloth, reducing the starkness of the joins in the colors. In wool, this would look stiff rather than shaded, so I took the basis of her palette but distributed it differently. The colors of the flowers make quite strong statements, and the scarlet touches bring out the richness of the greens.
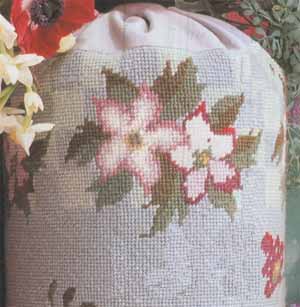
A powdery background as needed to show these off to their best advantage while softening the overall effect. Bolsters need borders, but I felt that it would have been presumptuous to add anything to what seemed a perfect pattern. The answer was to take a feature from the pattern, rather than creating something new, and repeat it right around the edge.
I love this posy of flowers and leaves, and four posies fitted perfectly along each edge. The shaded check pattern underneath I took from another damask silk, using it simply to emphasize its purpose as a border, but in retrospect I wish I had added another row of squares to each side.
I would have liked to have used this motif again to make ends for the bolster, and have painted a piece of canvas to show my intention. Time did not allow me to make these adjustments, but the idea is there for anyone to adopt. To make the ends, copy the little flowers and then put in the check squares behind up to a diameter of 7in (18cm).
Having talked exclusively about bolsters, I should also point out that this would serve equally well as a large stool top, and the central pattern would fit a long, narrow fender stool if the border were omitted.
MAKING THE BOLSTER
If you wish to make a bolster, it is essential that the finished needlepoint is carefully stretched (refer this post for details), to ease out any distortion.
MATERIALS
10in (25cm) of fabric, 36in (90cm) wide
Two large buttons from a covering kit, 1½in (4cm) in diameter
Bolster pad 20in (50cm) long and 7in (18cm) in diameter, or a role of polyester batting
Matching thread
Use ½in (1.5cm) seam allowances throughout. Trim the stitched canvas leaving a margin of fin (1.5cm). Cut the fabric lengthwise in half to make two strips 5 x 24ins (13 x 61cm).
With right sides together machine these two strips to the longest sides of your stitched canvas. Run two lines of gathering thread along the raw edges at each end. Fold the resulting piece in two, wrong side out, with the fabric strips at each end.
Baste and sew the raw edges together to make a long tube. Turn the bolster right side out; insert the bolster pad, and pull up the gathering threads as tightly as possible.
Use the spare fabric to cover your buttons, according to the kit instructions. Sew them on each end of the bolster to cover the gathered raw ends. If you have chosen to make needlepoint ends for your bolster, make it up as described above, but without the fabric strips.
When your bolster pad is in the tube, sew the needlepoint ends in place, using your tapestry needle and wool. Strips of braid at each end will help to cover any unevenness in the sewing.
PRETTY BOLSTER
FINISHED STITCHED AREA
22 ½ x 18in (57 x 46cm), to make a bolster 18in (46cm) long and 7in (18cm) in diameter
STITCH
Tent stitch (basket weave) or half cross stitch
MATERIALS
28½ x 24in (71 x 60cm) of interlock canvas, 12 holes per inch (2.5cm)
Size 20 tapestry needle
Size 20 tapestry needle
REQUIRED NEEDLEPOINT
A2 WHITE - 5 skeins
K429 PALE PINKY MAUVE - 5 skeins
J69 DUSTY PINK - 4 skeins
H70 DEEP ROSE - 4 skeins
G42 BRIGHT RED - 1 skein
B5 PALE GOLD - 1 skein
B8 GOLD - 1 skein
D10 OLD GOLD - 1 skein
W407 POND GREEN - 4 skeins
P418 SMOKY GREEN - 5 skeins
P665 GREY MIST - 32 skeins
P416 PALE MINT - 6 skeins
K429 PALE PINKY MAUVE - 5 skeins
J69 DUSTY PINK - 4 skeins
H70 DEEP ROSE - 4 skeins
G42 BRIGHT RED - 1 skein
B5 PALE GOLD - 1 skein
B8 GOLD - 1 skein
D10 OLD GOLD - 1 skein
W407 POND GREEN - 4 skeins
P418 SMOKY GREEN - 5 skeins
P665 GREY MIST - 32 skeins
P416 PALE MINT - 6 skeins
